Introduction
In this third post on impulse responses, we will take a look at the main recording technique used for (metal) guitar and we will introduce a basic equalization technique based on two filters : the high-pass and the low-pass filters.
Close miking
The main recording technique used to record saturated guitar tones consists in placing a microphone very close to the guitar cab speaker : from 0 to a few inches. They may be positioned straight in front of the speaker or using an angle (from a few degrees to 45 degrees in general).
This technique will capture a specific tone depending on the exact position of the mic, taking into account two important aspects :
- the high directivity of the speaker projection for high-frequencies : high-frequencies will be louder at the center of the speaker
- using the proximity effects of the microphones : this effect increases the level of bass frequencies captured by the microphone as it get closer to the speaker (proximity effect happens for microphones when under a distance of 10-15 inches from the source, but it varies from microphone model to microphone model)
With these two characteristics, a small position change has a strong impact on the recorded tone : this has been -and still is – one the main way to adjust and balance the tone at the source, by simply moving the mic around and selecting the tone , in order to get a specific result.
From one speaker to another, and from one microphone to the other, the tones obtained can be very different for the same “physical” position.
This recording technique is actually used in many situations, for many types of instruments and for voice as well : this technique is good to isolate the recorded sound from ambient noise, reverb effects, and it allows for single instrument recording (the sound engineer can then mix them with more freedom).
Impulse responses are created using the same approach and the same recording techniques : IR providers usually offer different microphone positions so that guitar players or sound engineer can select their tone in large palette of choices. For distorted guitar tones, extreme effects are combined : an IR frequency mix is pushed to an extreme representation by the distorted sounds provided by guitar amps and their overtones. When playing on a clean amp, there are tone changes as well when changing the mic position, but they are not as extreme or spectacular as the ones that you get with distorted channels.
The figure below presents the usual microphone recording positions names :
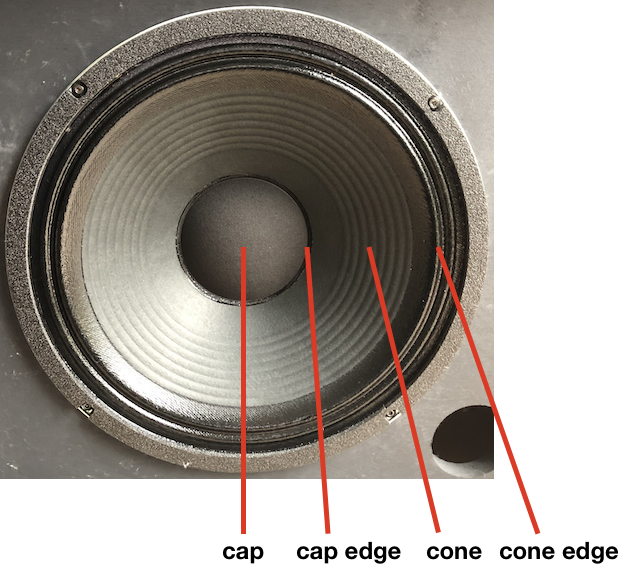
So we have :
- The central position : the (dust) cap, treble is very high in this zone
- The cap edge : often a good starting point for distorted tones, with a useable tone balance
- The cone
- The cone edge
Mic is said to be “on-axis” when pointing the cap area, and off-axis for the other areas. If the mic is straight in front of the cap, it is “straight on axis”. And some positions can be “angled”.
Some IRs providers may use these terms to describe the IR characteristics. Knowing them can be useful to better understand recording tutorials or videos.
The figure below provides an explanation about the position impact on the tone :
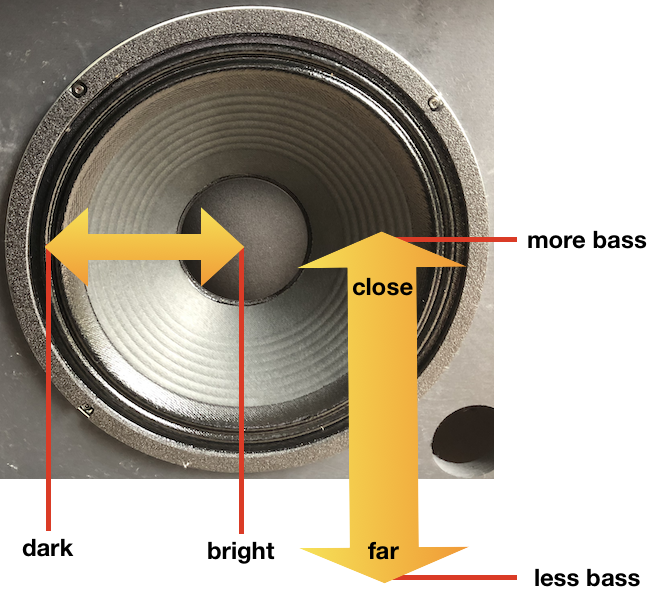
Mics in the center position (dust cap) will produce more treble, moving away from the center will produce darker tones. A close distance of the microphone will produce more bass, moving away from the speaker will produce less bass.
Cabs, speakers and mics
These three components get captured through the IR creation process. Each of them will contribute to the result :
- The cab : its type, construction, volume and the way the speakers are positionned
- The speaker, with its specific tone and behavior
- And the mic and it’s positions, that will have a tremendous impact on the captured tone
The speaker is of course a major component: it will give the sound a specific colour, and that’s precisely what we want from a guitar speaker (colour the sound !). If you already are a rock or metal player, then you probably already know that the market is dominated by Celestion and it’s Vintage 30 (V30) speaker -which is actually a 60-70 watts speaker by the way-. But Celestion offers many other interesting speakers : while its cumbersome and costly to own multiple cabs or to change cab speakers, it becomes extremely easy to use them by leveraging IRs.
For distorded sounds, other speaker providers are interesting as well :
- Eminence
- WGS
- Jensen
The guitar cab also has a strong impact on the tone : the tone provided by 1*12, 2*12 and 4*12 are differents – in the bass section, as it is easy to understand that the bigger cabs have a larger volume and will produce more bass- but it is interesting to note that the global tone balance is strongly affected by the cab design and speaker implantation, and this even when using the same speaker models. This is more noticeable for distorted sounds.
And last, the microphone : it’s sonic signature will have a strong impact on the tone.
Microphones frequently used for IR creation are the ones that are used for standard recording :
- Shure SM57 and its clones
- Sennheiser MD421
- Sennheiser E906 and E609
- BeyerDynamic M160
- AKG C414
- Royer 121
- Neumann U87
.. and there are many many more models on the market, from these brands or others (Audix, Audio Technica, Electro Voice, …). Each model will produce a specific result.
A few recording position examples
In these first examples, the signal chain used is the following :
- DiMarzio Dominion Bridge
- Maxon OD-808
- IRT 60 – lead channel
- Fatboy Celestion V30
- Shure SM57 on-axis and off-axis
- No filters, eq or post-processing
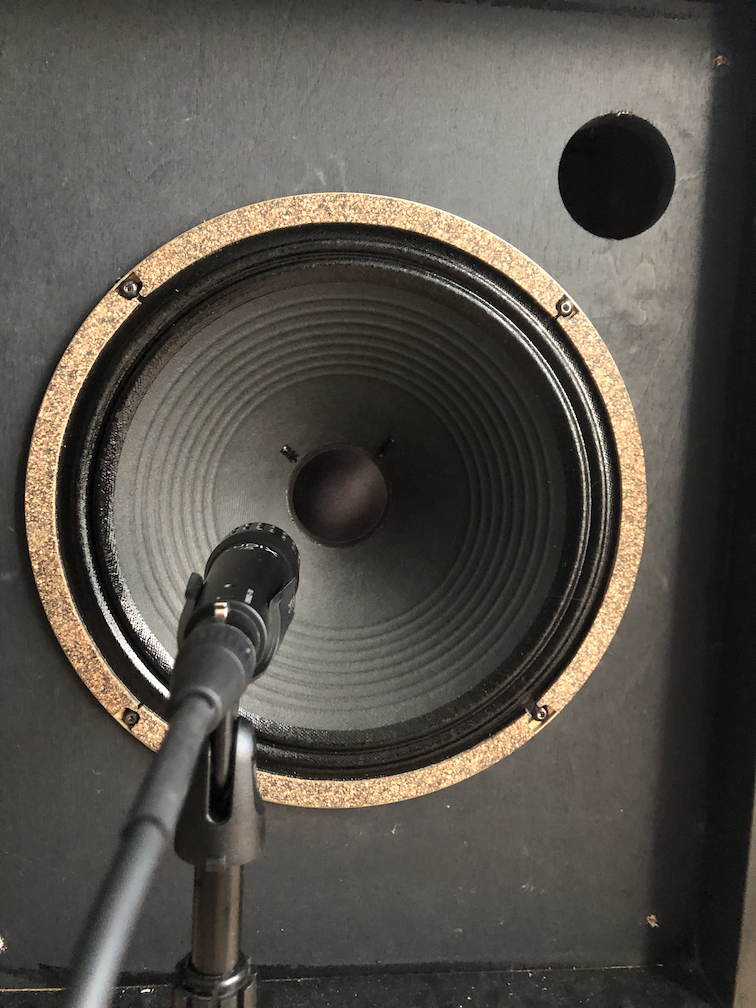
The cab used is a Zilla Fatboy that looks like this one:

The Dominion bridge has -by design- a treble roll-off that makes it easy to use and get a balanced tone : I find it easier to record -without any correction or eq- compared to other pickups.
Note: in order to get a better perception of the differences, consider listening to the samples with good earphones, headphones or monitor. Computer, tablet or telephone speakers might not be very accurate.
The riffs and partial song covers presented here as samples are used for illustration and educational purposes (using amps and IRs). These riffs and songs remain the property of their copyright owners.
Dominion bridge – DropD – V30 Cap Edge 0,5 cm
Dominion bridge – DropD – V30 Cone 3 cm
Dominion bridge – DropD – V30 Cap 3 cm
Dominion bridge – DropD – V30 Cap 3 cm right / Cone 3 Cm Left
On the two last samples, the difference is quite obvious with more high frequencies on the cap on-axis position.
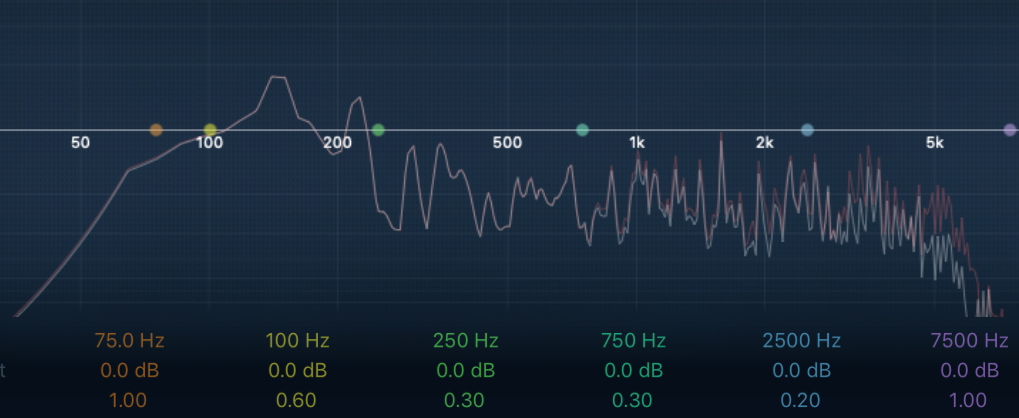
A graphical view of the frequencies will show the difference as well (red line = right channel):
This video is really interesting as well as it will show further mic positions with the tone obtained:
The next examples are using IRs to illustrate the tone difference from different mic positions :
This time the signal chain is :
- EMG 81
- DI to sound card
- Plug-in Mercurial TSC 808
- Plugin Ignite Emissary, canal lead
- Two-Notes Wall of Sound
- IR Fatboy V30 Overdriven.fr
No post-processing or EQ.
Example of settings :
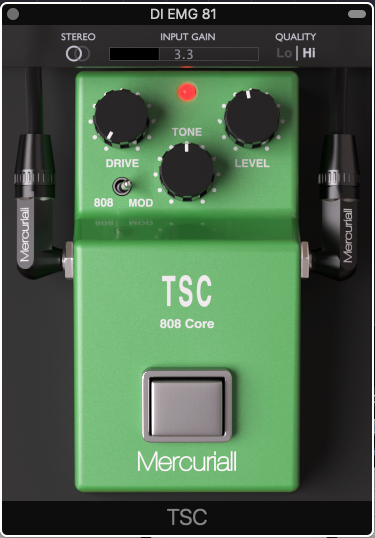
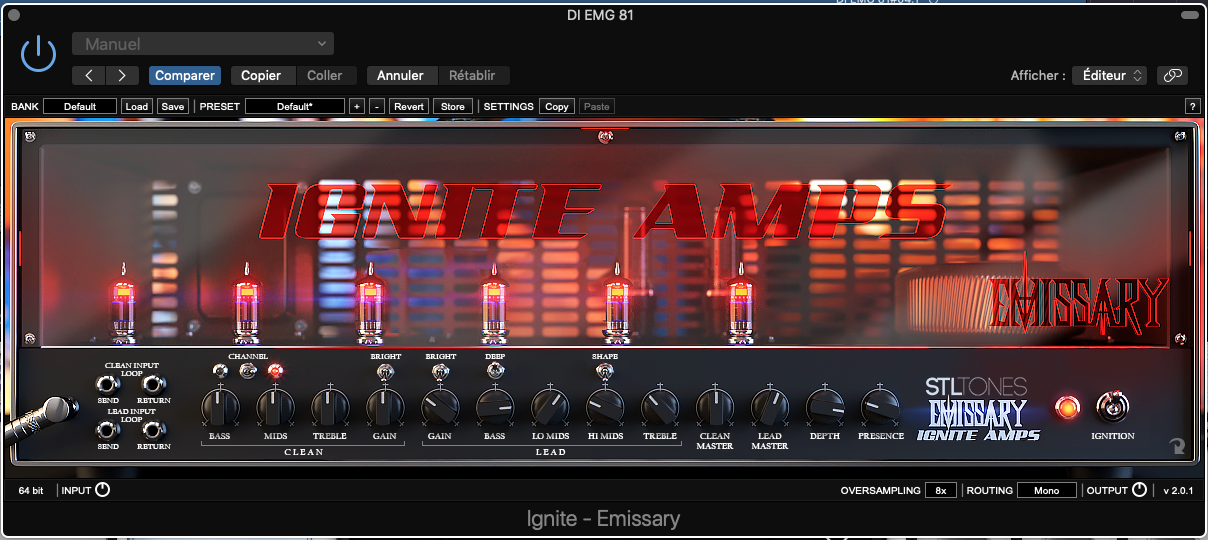
Here a four positions with a V30 and an SM57 : these IRs are quite sharp (lot of treble) and do not have that much bass, so I slightly raised the bass and low-mids on the amp.
EMG81 bridge – Standard – V30 SM57 Dust cap 1 cm
EMG81 bridge – Standard – V30 SM57 Cap Edge 1 cm
EMG81 bridge – Standard – V30 SM57 Cap Edge 3,5 cm
EMG81 bridge – Standard – V30 SM57 Cone 1 cm
So, we can recognize the riffs (well, I hope so 😉 ) but the sound is a little bit muddy and harsh, and some samples are maybe a little bit overly compressed. Still the cap edge positions have an interesting bite… IMHO.
Of course, we could go for better settings on the amp in terms of gain and EQ, but if we feel like the general balance is there, we can start tweaking the IR and apply some egalization settings, and may be have a few round-trip of IR tweak / amplifier ajdustments… I usually start by using two basic filters : the high-pass filter and the low-pass filter. These filters can have a very important impact on the final tone.
HPF and LPF
High-pass and low-pass filters are important in electric guitar miking and recording, especially for distorded tones.
- High-pass filters are used to decrease the bass frequencies in the filtered signal : usually they are used to reduce mud and rumble from the signal and regain precision and definition. Quite often, it is set around 60 to 90hz but it can be set to higher values, depending on the IR (120-140 HZ or more)
- Low-pass filters are used to decrease the high and very high frequency to limit treble harshness and hiss. Quite often, 7500 HZ is a good starting point. In practice, it can be set to lower values (6500, 5000 HZ), and sometimes a little bit higher (8500 HZ, 9000 HZ or 10000 HZ, rarely above).
Using these filter can drastically affect the tone balance that you will obtain : reducing bass and low frequencies raises the perception of mids and highs, reducing high raises the mids and lows. This tonal change will allow you to get a different balance in the filtered signal, where bass resonance and hiss will be limited. Because the signal will get clearer, it’s perception will be enhanced and quite often will become more pleasing to the ear. Once you apply and adjust these filters, you may have to go back and forth between your amp settings (gain, EQ) and the filter settings.
Some IR loaders embed directly these filters. Using a DAW, you can also leverage some EQ plugins that you will place after the IR loader : these EQ plugins often have HPF and LPF capabilities.
Attention : these filters can be set with more or less agressive settings, depending on the slope or rate that you use (12 db/octave, 18 db/octave or more..). The higher the db/octave the steeper the filter will be, cutting more frequencies.
The Two-Notes Cab.M and the Mooer Radar pedals have high-pass filters built-in, the Mooer also has an LPF.
The next examples are using a FabFilter ProQ2 plugin after the Two-Notes WOS plugin. It is the same samples as the previous ones, on which we apply the filters (quite aggressively in this case).
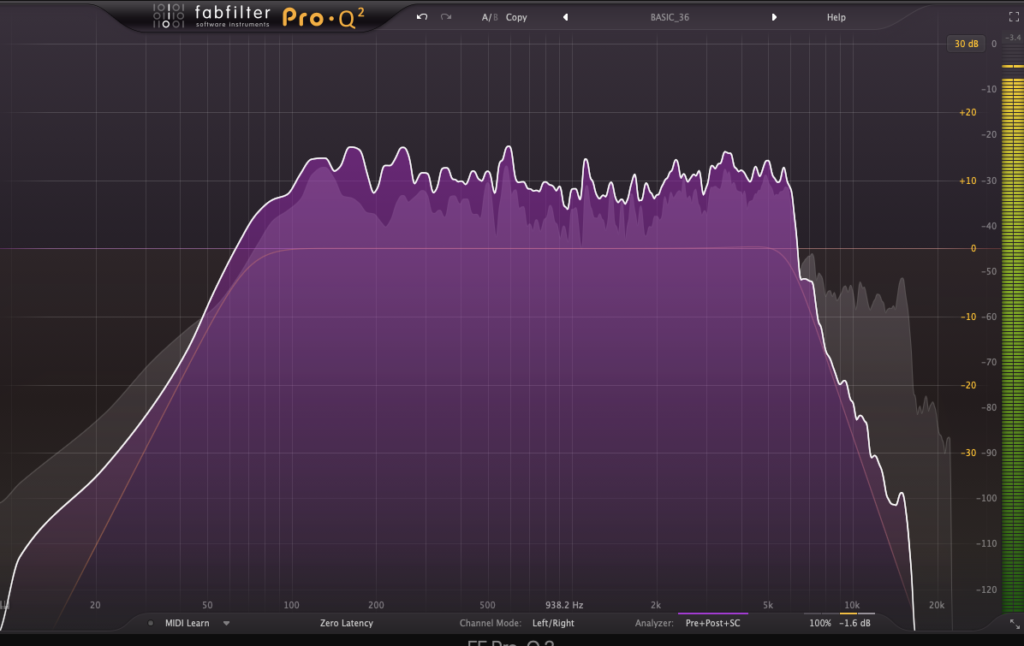
On the first sample, the signal looks like this without filter :
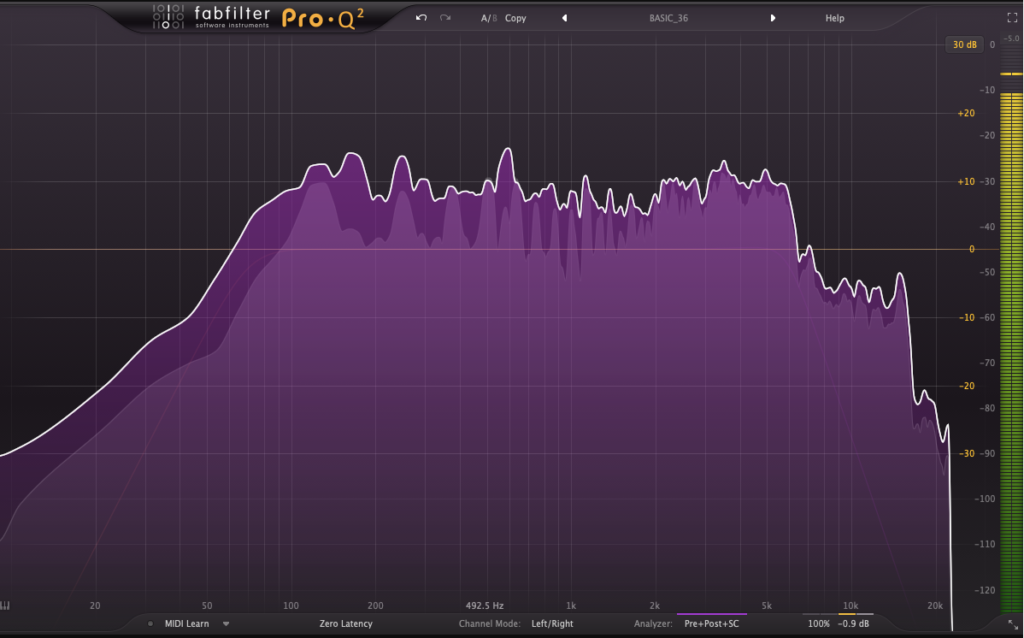
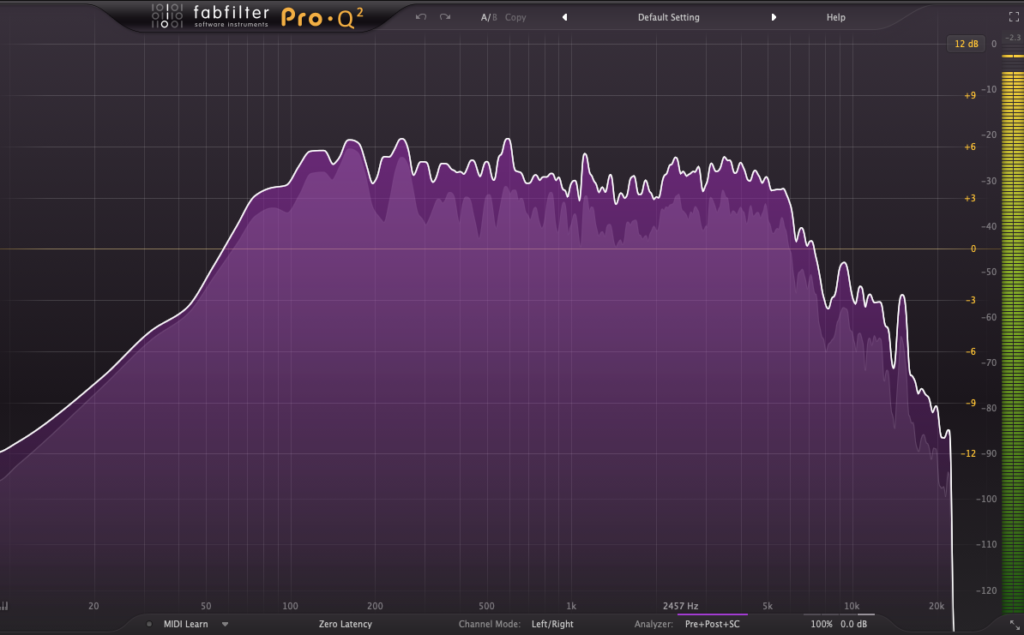
We then set the HPF at 70Hz with a 24 db/octave slope and a LPF at 5800 HZ with a 36 db/octave slope , because the selected IR has a lot of hiss and harshness.
The signal then looks like :
EMG81 bridge – Standard – V30 SM57 Dust cap 1 cm
EMG81 bridge – Standard – V30 SM57 Dust Cap 1 cm – HPF and LPF
The tonal balance slightly changes and harshness is lowered. It is still not perfect – far from that – and we could still revisit our amp settings and filter settings. Or change for another IR , moving away from the speaker center, that might be better suited to our situation.
On the Cap Edge 1 cm example, we use a low-cut at 90 HZ (24 dB/oct) and a high-cut at 6500 Hz (36 dB/oct).
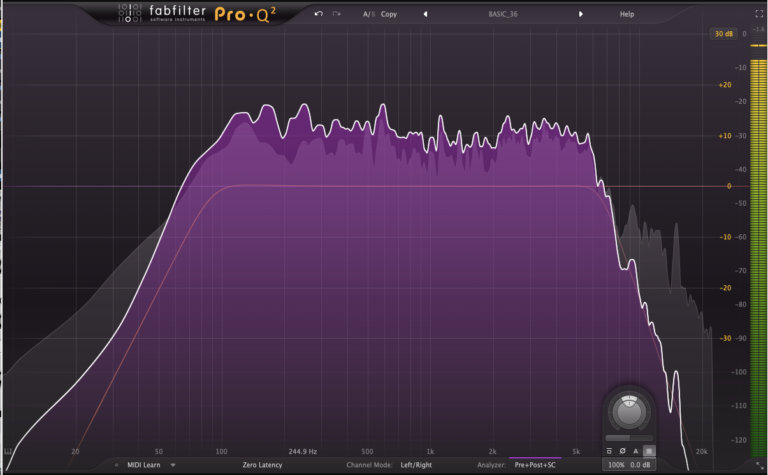
The original sample is this one :
EMG81 bridge – Standard – V30 SM57 Cap Edge 1 cm
The filtered version :
EMG81 bridge – Standard – V30 SM57 Cap Edge 1 cm HPF and LPF
Same as the previous example, the tonal balance is slightly modified and a lot of the original harshness is filtered out.
Conclusion
The cab miking and recording techniques introduced here are used when capturing impulse responses, so that the players and sound engineer have access to many tonal options.
Impulse responses do not always directly sound exactly the way you want : everyone has its own preferences or is looking for something specific for a given riff or song. The first adjustment I would recommend is to start using HPF and LPF to get a cleaner signal. Do not forget to adjust these filter settings to the specific IR you are using and to the tone you are chasing !
Continue reading
Previous post : Impulse responses : part 2 (signal chain and IR loaders)
Next post : Impulse responses : part 4 (using pedals)
Leave a Reply