Introduction
In this second post, we discuss the signal chain for using CAB impulse responses, as well as an introduction to software IR loaders.
Signal chain : introduction
It is the path that your guitar pickup signal will follow in order to be sent to the impulse response loader. The loader will transform the signal by applying the selected IR(s).
For distorted guitar sounds, when using an actual guitar amp, the classical path will be :
- The guitar
- An overdrive or boost pedal
- Then the guitar amp (usually a preamp section plus a power amp section)
- Out to the guitar cab
In this setup and using modern amps, most of the distortion is generated by the preamp section of the guitar amp. Other elements in the path impact the signal either by shaping it, adding some specific color to to the sound (overdrive pedal, power amp section, speaker) or by boosting the gain level (overdrive pedal). Of course, this it not the only setup used to produce distorted sound, but it is one of the most typical and popular ones. So we will use this path as a starting point for the first IR setup.
We will introduce an IR loader in the signal path in order to apply our IR to our guitar signal : to get an overview of the different possibilities (software and hardware), you can refer to the first post of this blog serie.
In the real world, the sound is obtained by using a guitar cab :

When adding an IR loader, our signal will be sent to this device that replaces a CAB and a recording mic : the output must then be sent to a « neutral » speaker (classical audio speaker or device) instead of our guitar cab. It will then produce directly the final in-the-room sound or the to-be recorded sound.

IR loader as a DAW plugin
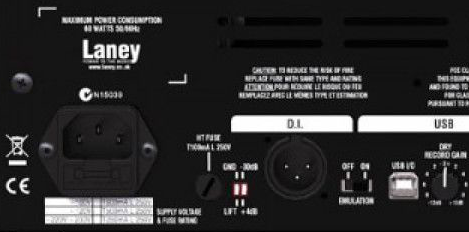
In this first example, we start illustrating the use of IRs with a Laney Ironheart Studio. This small amp is quite interesting because it embeds an internal load (so you can use it without plugging a cab to it) and because it has an amp DI output (DI out, with a cab simulator that can be turned off). With this amp, you can output a « complete » DI out signal (preamp+amp out). This is equivalent to using a loadbox plugged to the output of the amp.
The signal path then becomes :
- The guitar
- A Maxon OD-9 overdrive
- Laney IRT Studio
- Laney DI out to sound card
- Logic Pro X on Mac
- IR loader : Two-Notes Wall Of Sound, with Two-Notes IRs
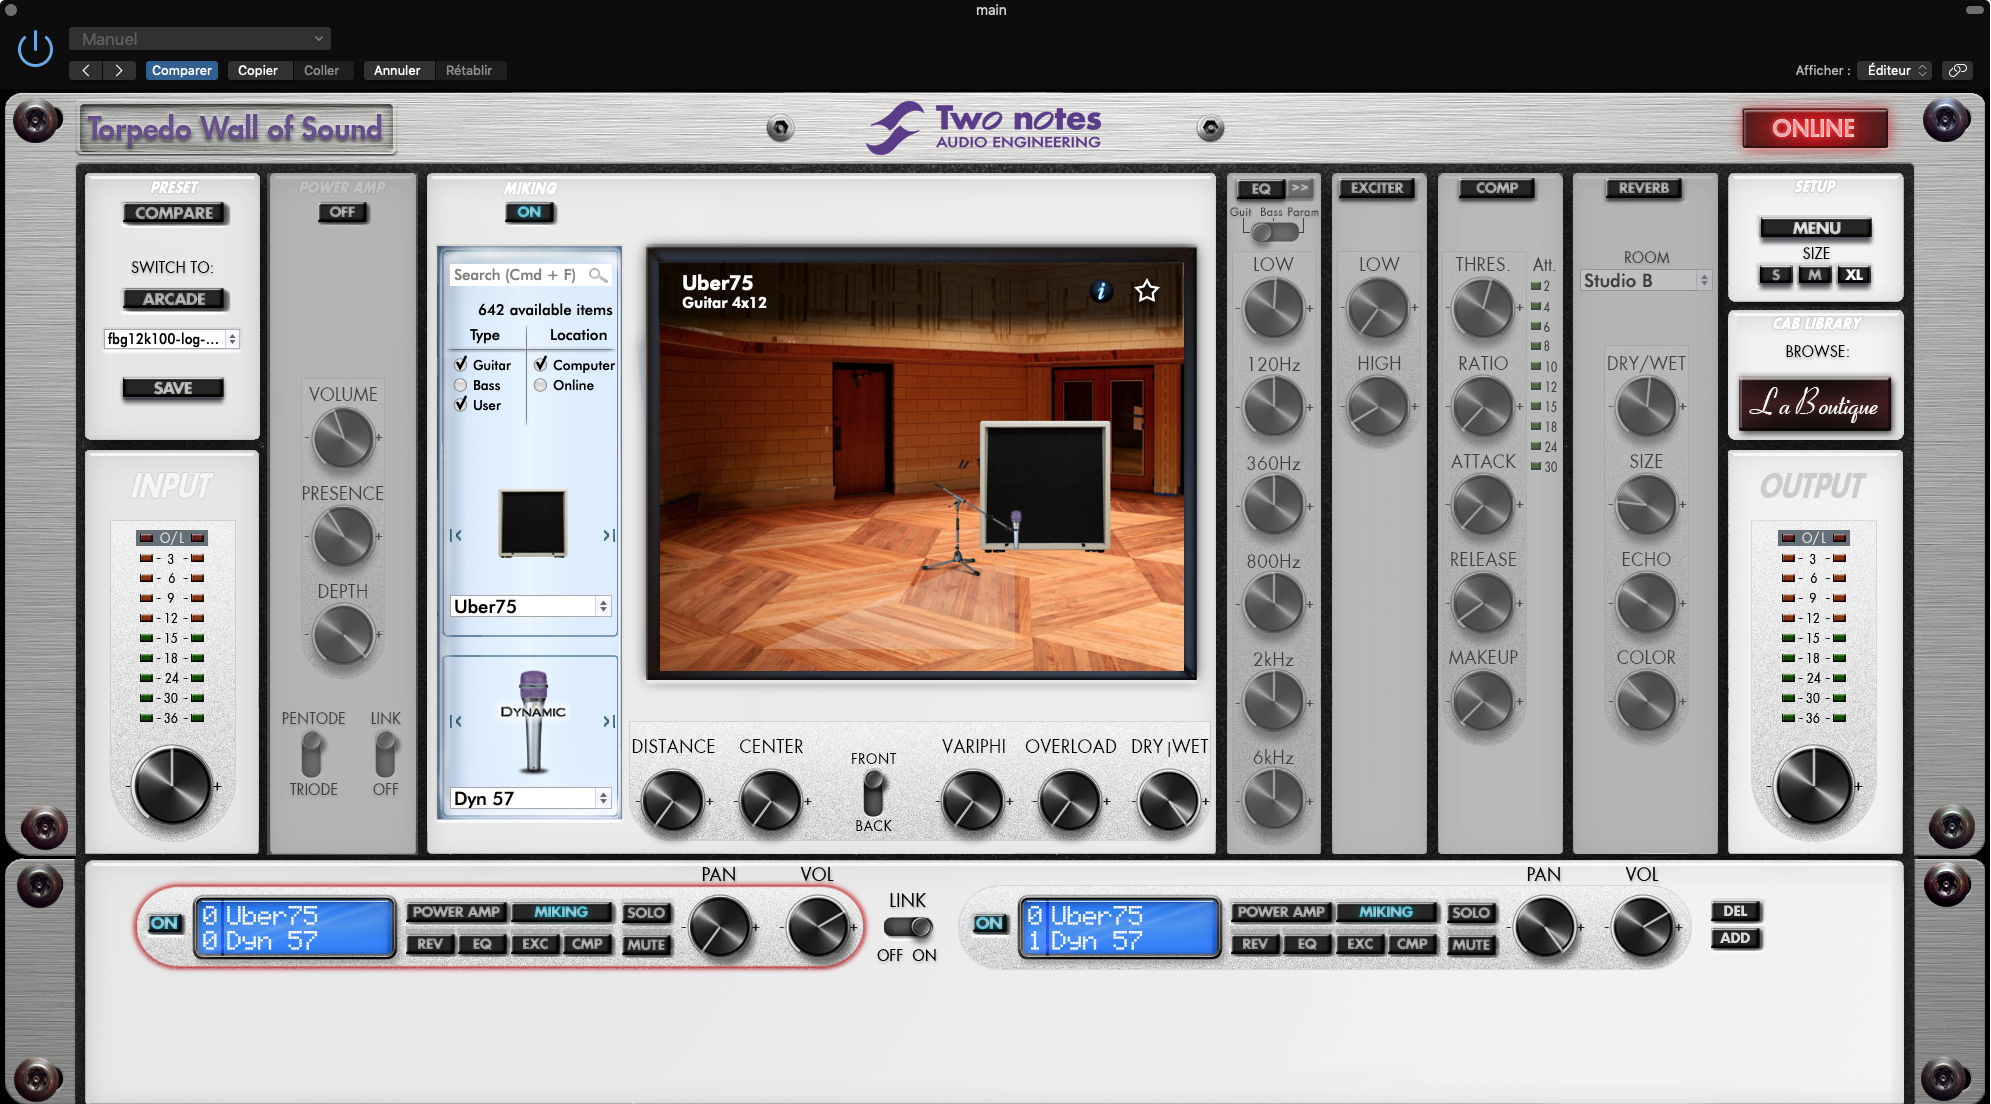
In the DAW, you’ll need to configure an instance of the WOS plugin on your track, and set the input of the track to the corresponding entry of the amp on your sound card (input 7 in my case) :

In the WOS plugin, simply select your favorite metal cab : in this example, I chose the Uber75 cab, that combines Celestion T75 and Celestion V30, recorded through a Shure SM57 (named « Dyn57 »).
If you do not know yet the user interface of the Wall Of Sound plugin, you can consult the documentation -which is clear and nice- and get an evaluation version of the software : check this link to learn more about WOS.
Here is a quick and simplified introduction to the WOS UI:
- In the center section, you can select the cabs and mics. You can change the position by dragging the mic graphically or alternatively use the Distance and Centers buttons. Front/back allow you to switch the position of the mic to the back or the front of the cab. Variphi enables phase adjustment, overload adds distortion and dry / wet let you define the proportion between the original signal (DRY) and the processed signal (WET). By default it is set to 100%, and it will stay at this level most of the time for distorted guitar tones.
- At the bottom of the screen, you can access the channel(s) settings : in the example below we use WOS as a stereo instance, so 2 IRs settings can be defined : by default one hard panned left and the other hard panned right. The link button is useful as it will let you quickly change cabs and mics for the two channels.
- The plugin embeds as well a power amp simulation section, an EQ, an exciter, a compressor and a reverb. We’ll go deeper into these possibilities in future posts.
- Last, you will see two level meters and two buttons to adjust the signal level : one for the signal INPUT and one for the signal OUTPUT. These two are importants and will let you adjust the volume directly within the plugin.
Note : from one IR file to the other, volume can be very different. The output section lets you compensate for these changes directly within the plugin.
In a general way, I try to set the level of the input signal in order to reach -9 DB (-9/-6 DB in peak), and the same for the output signal (-9/-6 in peak). Sometimes a bit more, sometime a bit less.
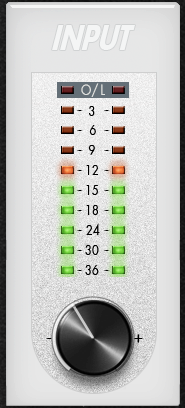
It is important to avoid clipping (overloading) the input or the output in order to get good results.
Note: for practice or tracking, it is important to use a sound card with low latency. Latency under 10-12 ms is fine, over 15 or 20 ms it will cause issue as there will be an annoying delay between your playing and the perception of sound.
Get started
If you are new to IRs -or simply if you do not try to record your cab with distorted sound-, you can probably start by forgetting and resetting your amp settings (tone and gain) ;). The shape and tone of IRs will mainly drive your new settings.
My advice -for beginners- is to start with everything reset to noon :
- Overdrive : level set noon, tone set to noon, drive set to 0
- Amp : bass / mid / treble / resonance / presence / gain : all set to noon (less for the gain control if you have a high-gain amp).
The first step is to enter your sound card and your DAW with a correct line level and without clipping the input: with distorted tone coming from a load-box or a preamp, that is quite easy as the signal is usually already strongly compressed (meaning : it’s dynamic range is slightly reduced compared to a guitar DI signal or a clean channel signal).
Depending on your signal path (a DI signal like the Laney, signal from a load-box, a preamp pedal,…) you will need to adjust the output volume of your amp device : my starting point is usually 10H or 12H for the amp or the pedal volume (or between 1/3 and 1/2 if you prefer). On the sound card, I try to match this output level by setting the preamp entry to the middle position (or between 1/3 and 2/3) so that the preamp is in a nominal working range. These settings may be slightly different for the hardware you are using. They are provided as starting point examples and not absolute references.
The second point to bear in mind is that working with IRs is the same as working when miking/recording : IRs include the microphone and this will strongly impact the tone that you will get. The impact of the mic is really strong. Moreover, guitar cabs are often recorded using close miking techniques : the microphone is positioned very close to the cab, from zero to one or two inches. This creates a very strong « magnifier effect » and changing the mic position will drastically change the tone. By moving the mic around, the tone will get clearer or darker, with different frequency mixes (more or less bass, mids and treble).
The third point is that what you hear from a demo and other’s gear with specific settings will not necessarily be what you get with your own gear. You will probably need to adjust your settings to get a comparable tone. The output signals obtained from a guitar vary greatly from one pickup model to another pickup model, and your guitar impacts the overall tone as well (dark, clear, …). Your overdrive and amp might have a tone of their own : that brings many differences to someone else’s setup. Still, the strong coloration and shaping of IRs will help you approaching the tone that you want to get.
Last : your guitar pickups and the tuning you use will be important as well. Playing in C, B, Drop B or Drop A creates some darker tones, with more bass and less high frequencies compared to standard tuning. So your IRs selection and settings may well be impacted by your tuning choice.
First attempts
The following samples are created with different guitars, pickups and tunings. They all go through a signal chain which is the following: Maxon OD9, Laney IRT (lead channel) and Two-Notes Wall of Sound in Logic Pro with a Uber75 cab and a SM57. No filters or post EQ. These samples were created by regular DI recording and re-amped.
Note : a TC Sentry noise gate and a Lehle split are also used.
First samples below use the default mic position: distance 0, center 0 :
Dominion bridge – DropD – IRT all set to 12H, gain 5, boost1
SH4 bridge – C Standard – IRT all set to 12H, gain 5, boost1
AHB3 bridge – Drop B – IRT all set to 12H, gain 5, boost1
EMG81 bridge – E Standard – IRT all set to 12H, gain 5, boost1
Conclusion : the tone is quite aggressive, a little bit harsh in the treble section, especially at higher volume, excepted for the DiMarzio Dominion which has a less aggressive voicing (treble roll-off). You can do a small experience : listen to the samples with different volumes : you may be able to observe that the tone balance and the harshness that we perceive change with the volume level. The EMG 81 remains quite cutting and somewhat defined, the other samples are a little bit muddy or rough…
First settings
Do not rush to the EQ in WOS or in your favorite EQ plugin ! Just like in a real recording session, the first adjustments would rather be :
- EQ’ing the amp
- Adjusting the amp and overdrive gain
- Change the mic position to achieve a better or difference tonal balance
As an example, we will try to change the settings in order to keep a trash sound but with more definition and less harshness.
For the Drop D example, here are a few changes in settings with the results. These samples are not absolute references, just illustration of the changes obtained.
Dominion bridge – DropD – Bass -1, Middle -1, Treble +1, Dynamic 100, Tone 65 , IR Center 0, Distance 0
Dominion bridge – DropD – Bass -1, Middle -1, Treble +1, Dynamic 100, Tone 65 , IR Center 37, Distance 5
Dominion bridge – DropD – Bass +2, Middle -1,5 , Treble 0, Gain lowered to 4, Dynamic 100, Tone 65 , IR Center 37, Distance 7
Updated settings for the standard C samples:
SH4 bridge – C Standard – Bass -1, Middle -1, Treble +1, Dynamic 100, Tone 65 , IR Center 17, Distance 0
SH4 bridge – C standard – Bass +0,5 , Middle -1,5 , Treble +0,5, Gain lowered to 4, Dynamic 100, Tone 65 , IR Center 19, Distance 4
For the drop B examples :
AHB3 bridge – Drop B – Bass -1, Middle -1, Treble 0, Dynamic 80, Tone 50 , gain lowered to 4, IR Center 27, Distance 7
AHB3 bridge – Drop B – Bass -1, Middle -1, Treble 0, Dynamic 80, Tone 50 , gain lowered below 4, IR Center 20, Distance 20
Conclusion
When working with IRs :
- You will need to adjust your amp gain and EQ, as well as your overdrive settings. These settings might be different from the ones you use with your real cab.
- Dynamic mics like the SM57 can be quite bright and produce some harshness in the high frequencies. Lowering the gain will allow you to lower the harshness and bring back some attack and definition in the tone.
- Moving away from the center position of the speaker produces less treble and less harshness.
- Different pickups and tunings will produce different results for a same IR : lower tuning will limit or eliminate treble harshness as these tuning produce simply less treble. So an IR that may sound harsh for a tuning and a pickup might be very interesting for another (lower) tuning and pickup.
- The cab/mic combination from IRs has a very strong tone shaping effect : all samples from this post use the same IR and tend to have a strong resemblance.
The settings used to practice and the ones used for recording and mixing are often different : in the first case, playing alone and loud, the guitar sound will fill the whole sound space. The player will look for a tonal balance with more presence in the bass and the mids, and less treble to lower the harshness. In the context of a mix, the situation will be different : sound space is precious and the different instruments will compete and overlap. In order to perceive the different instruments, saturated guitar sounds will become much thinner, especially their low-end section. Many IRs users may end-up using different settings and presets, depending on the context and the different tone balances they want to achieve. Guitar sound volume will be different as well : quite high when playing alone, much lower when brought back to mix-level and this has an important impact on our perception of tonal balance.
Listen again to our standard tuning example, the riff from No Remorse by Metallica : isolated it its quite sharp and has an aggressive treble profile.
The following sample is using two tracks : one left one right. This already gives the sound more relief, and the small sync differences produce a tone that is a little bit thicker. Without changing the EQ or IR settings, the experience is already a little bit different.
EMG81 bridge – E Standard – IRT all set to 12H, gain 5, boost1, 2 guitars, hard pan
If you now listen again to the original title by Metallica, you’ll hear that the guitars in the original mix are really thin, with a little bit more of resonance in the low frequency, a little bit less mids, and less treble.
Continue reading
Previous post : Impulse responses : part 1 (introduction to IR)
Next post : Impulse responses : part 3 (IR basics)
2023-07-15 at 01:59
thank you