Introduction
Impulse Response technology (IR) has become extremely popular among the guitar players community, from beginners to accomplished professional players.
This technology allows the creation of sound footprints for a given hardware (a guitar CAB and a recording mic) and to apply this footprint to your own recording chain, in studio, at home or live, on-stage. IR technology is used in many hardware and software solutions available to guitar players and studio engineers. This post is the first one of a serie dedicated to using IRs, especially for beginners with the technology… Let’s get started with IRs.…
Introduction to IRs
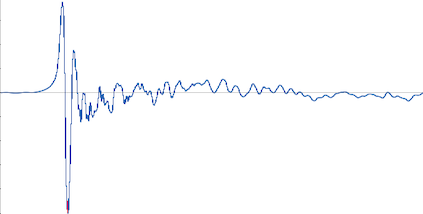
Impulse Responses are audio files (wav, aiff) of short length : from 18 ms to 50, 100, 200 or 500 ms. They are based on signal processing and mathematic methods named convolution and deconvolution. By capturing a signal (impulse) and applying convolution methods, it can create the signal footprint : the impulse response.
These techniques allow then to combine your input signal and the IR, using signal multiplication, which is very similar to the way filters are used and applied. For guitar players, it means that we will be able to combine our signal coming from the guitar amp or preamp, and the IR, defining the footprint of the recording that you want to use. This will allow a guitar player to get the sound of the captured device, as if he was directly using this device. As a player, you will access a very large collection of hardware (guitar CABs, recording mics) through the numerous IRs available, expanding your tone possibilities, and allowing for almost infinite combinations of these footprints to create new sounds…

IR creation is usually achieved by using a dedicated software that will generate a source signal and capture the result. Two methods can be found : a starter pistol to generate a bang (complicated in practice) and a software that will sweep all frequencies through the target device (the impulse), capture the result and generate the footprint (the impulse response).
For simplification, in the guitar world, IRs are most of the time named after their two major components : the guitar CAB and the microphone used to record the signal, for example Mesa Boogie Recto 412 and Shure SM57.
In order to use an IR, you will need a computer and a dedicated software or some hardware with IR loading capabilities : a multi-effects pedal, a dedicated pedal, or an amp load-box with embedded support for IRs. Software amp simulators include -in most cases- a component able to load and apply the impulse responses (this is often the CAB section).
This technology will allow you to get high-quality and realistic guitar sounds.
The riffs and partial song covers presented here as samples are used for illustration and educational purposes (using amps and IRs). These riffs and songs remain the property of their copyright owners.
Here is a sample of a Metallica cover -The God That Failed-created with custom-made IRs :
Metallica The God That Failed – IR demo
IRs: get started
So, in order to use IRs, you will then need an IR loader into which your amp signal will be sent (amp signal back to line level). A preamp can be used as well, either software or hardware.
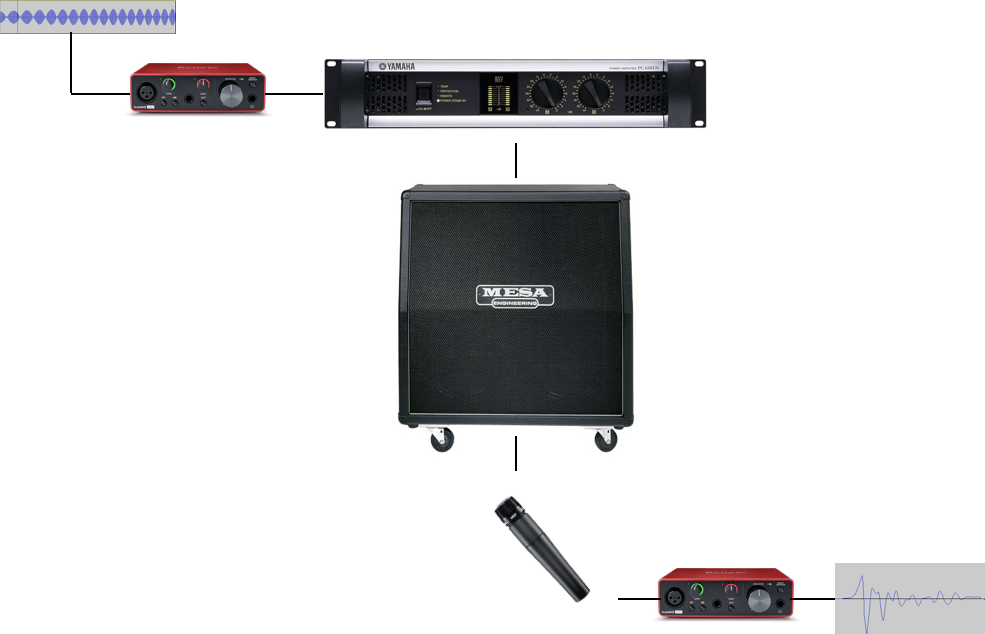
A typical distorted guitar signal path will look like this :

Usually, we find:
- The guitar itself 😉
- A boost or overdrive pedal (not mandatory but oftenly used to get good metal sounds)
- The guitar amp: this one combines preamp and power amp
- The guitar CAB
- And -if you record or send the result to a PA- the set of devices used for recording, including and starting with the recording microphone.
The way you will use impulse responses will depend on the solution you will opt for, as many configurations and solutions are available.
In the first figure below, the IR loader is based on software. In that case it will often be running as a plugin within your DAW:
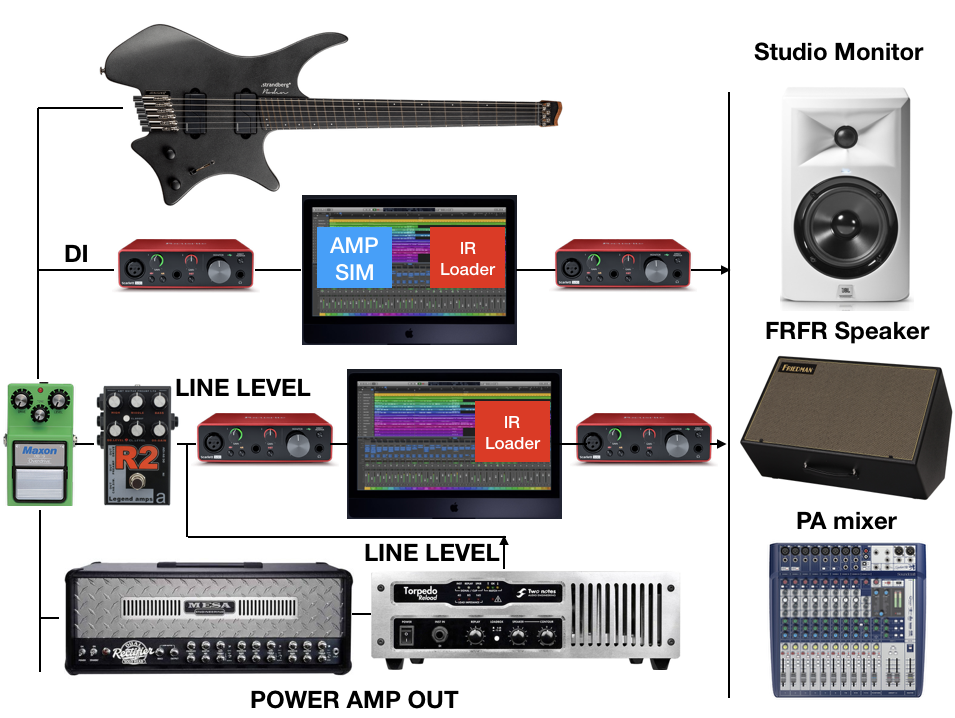
In the ‘DI’ path above, the guitar pickup signal is sent to the sound card and everything after is generated by software simulation : amp part and IR part.
In the other paths, we get :
- A preamp signal sent to the sound card which is then routed to the IR loader
- A amp output signal brought back to line level by a load -box, sent to the sound card and then processed by the IR loader
In the next figure, hardware based solutions are presented (loadbox, IR pedal, multi-effects pedals):
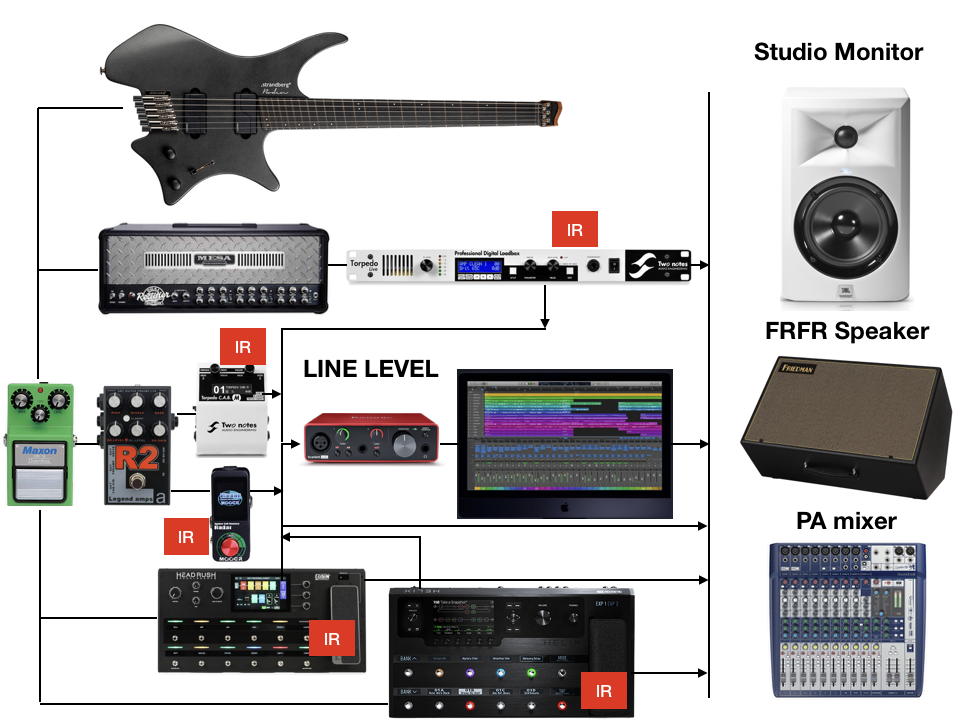
So, on the picture, we have as example of hardware managed IRs devices :
- A Torpedo Reload load box (Two-Notes): it embeds directly an IR loader
- A Torpedo CAB M. pedal, which is an IR loader in pedal format
- A Mooer Radar, another IR loader in pedal format
- An Headrush multi-effects
- A Line6 multi-effects
Warning:
- Never plug directly your power amp out to a line level device (sound card or pedal)
- Always plug a CAB or a load box to your amp (with matching impedance)*
*Unless your amp can use an embedded load : this is quite rare and will be explicitly mentioned by the amp vendor.
A few demos
You will get good and realistic results, if :
- You use a configuration tailored to the sounds you are looking for (guitar, amp, pedals, signal chain settings, a precise selection of IRs, adapted EQ settings) and tailored to the context in which you are using it (practice, cover, live playing, tracking, recording mix…)
- You adapt this configuration to your listening device and context (studio monitors, FRFR speakers, headphone, in-ears monitors,…) : all these devices have a specific coloration and will render your sound with important differences. Your experience will also be extremely sensitive to the listening volume, especially when practicing or playing alone.
A few examples recorded with IRs to provide some illustration:
Nazgul C Tuning Amon Amarth Crack the Sky riff IRT Two-Notes KEROZEN SM57
AHB3 Drop-B demo IRT Two-Notes GREENTRI DynBass52
AHB3 Drop-B demo IRT Two-Notes UBER75 SM57
AHB3 Drop-B demo IRT OwnHammer DZL V30 SM57
AHB3 Drop-B demo IRT Overdriven.fr Fatboy G12K100 E906
EMG81-EMG85 Slayer Season in the Abyss intro IRT Overdriven.fr Recto 112 SM57
Advantages and disadvantages
Using IRs will allow you to :
- Access a large collection of CABs, speakers, and mics, with many positions (essential for metal sounds). Buying many of these CABs and mics can be costly and cumbersome.
- Leverage the expertise of the sound engineer doing the capture : miking a CAB for distorted sound is not that easy, and takes time (mics and positions knowledge, proximity effect knowledge, various recording settings and parameters…)
- Record silently (!) without the actual recording constraints (recording room, noise, reverb…)
- Being able to use and reuse a large palette of sound consistently
- Change your sound with a mouse or pedal click
- EQ and adjust your settings very quickly and efficiently
Let’s discuss of a few disadvantages:
- In order to achieve the results and the sound you are looking for, you’ll need to learn a little bit about your signal chain, the different settings of your hardware and the characteristics of the IRs you want to use..
- You’ll depend on the choices made by the recording guy capturing the IRs: not as much freedom compared to placing your mics, defining the settings and recording directly your cab
- You’ll ultimately depend on the quality of the IRs you will be using, and the fact that they will be suited to your needs… or not.
Guitar CABs play a very important part in the tone you can get in a room or for recording : the results you will get with IRs will also be very realistic and convincing (live, or in a mix) if you spend a little of time to learn how to set them up and how to use them in a way that suits you. It is almost impossible to tell the difference between an actual recording and a recording done with IRs.
CAB vs CAB+mic
My first attempts at using IRs have been disappointing and frustrating and very far away from what you can hear in many Youtube demos. The first error was to think that throwing a Mesa 412 and an SM57 would just bring me my greatest tone : mistake !
In the first place, IRs are reproducing a recording situation (a CAB + a mic) : to get your preferred “sound-in-the-room” tone or your killer recording tone, you’ll probably need to learn, tweak and adjust.
In the second place, a real guitar amp and a real CAB brings a lot of dynamic and presence : you don’t listen to your live CAB through a mic when you play next to it, so this will change a lot of things when using IRs instead of the real CAB. And for IRs, your listening/rendering device (FRFR monitor, headphone, …) plays also a critical role.
Where do you find IRs ?
A few IRs collection are freely available on the Web, but most of the offering is commercial. Among the popular providers for metal players (but not only) we can name :
- Two-Notes Audio Engineering
- OwnHammer
- RedWirez
A lot of other providers are also offering IRs:
- Celestion
- Fat Lazy Cab
- Rosen Digital
- 3 Sigma Audio
- Lancaster Audio
- Chop Tones
- SinMix 3
- Kalthallen Cabs
- Frozen Sun Audio
- Trackmix Studio
- GuitarHack
- Ryan Harvey Audio
- …
Free demo versions (limited set of speakers and mics) are often available (OwnHammer, Celestion). Two-Notes has a very nice testing system as their online store (‘La Boutique’) is embedded into their IR loader software (Wall Of Sound or Torpedo Remote depending on the solution your are using) : you can test the CAB/speaker/mic and use it on your system (it means playing with it) before you buy it. In this mode, sound will be cut every 20 or 30 seconds, but it is really nice to try before buying.
Amp sims vendors (Overloud, BiasFX, BiasAmp, Mercuriall, TSEX50,…) usually embed an IR loader as well into their software. The IR collections bundled into these software are usually less extensive (less cabs, speakers, mics) than the ones from the specialized vendors in the lists above.
IRs offering typically includes collection of CABs and mics, with multiple mic positions or recording settings :
- Mesa 4×12 / Sm 57 / position 1, 2, 3, ….
- Mesa 4×12 / Royer 121 / position ….
- Orange 2×12 / Sm 58 / …
- Diezel 412 / MD 421
- …
Distances and positions are not always clearly presented or expressed : you sometime only have a file name, with a more or less explicit meaning. With some providers, the mic position can be set in a graphical way, by drag and drop or parameters selection, allowing you to obtain different tones by changing the mic position.
Conclusion
IRs allow guitar players and sound engineer to access a very large palette of sounds, for a few Euros or Dollars compared to the costs of actual CABs and recording equipments. They changed the way guitar players achieve their tone and allow for infinite reamping… IR part 2 will focus on the signal chain for guitar players.
Continue reading
Next post : Impulse responses : part 2 (signal chain and IR loaders)
Leave a Reply