- Created August 12, 2022
- Updated October 1, 2022
In this IR blog post #10, we will explore the results obtained through the use of different types of microphones.
When recording electric guitar sounds, the microphone is the element that does most of the work: its sound signature will strongly shape the final sound that you get. This blog article is more particularly intended for beginners and other novices in recording guitars – especially with high-gain guitars tone – and in the use of impulse responses: reading it is absolutely NOT essential to take advantage of IRs – do rather trust your ears 🙂 – but it may give you some hints for exploring your collections, identifying the type of tone you get and choosing your IRs for certain types of sounds or certain contexts.
Types of microphones
There are three main types of microphones :
- dynamic microphones
- condenser microphones
- ribbon microphones
Dynamic microphones are among the most widespread: they are the least expensive and the least fragile. They work on the same principle as a loudspeaker but in reverse mode: the sound pressure will make a membrane vibrate, a vibration transmitted to a magnet which will transform it into a current. They are also less sensitive than condenser microphones: they are therefore well suited to loud sound sources and easily support close-up recordings. They are very often used to record electric guitars, saturated or not, in the studio as well as on stage.
Condenser microphones have also become widely available: originally more expensive than dynamic ones, nowadays there are condensers in all price ranges. More fragile, they are generally rather used in the studio. Condensers are much more sensitive and generally produce a more detailed, more precise sound -or a less colorful sound if you prefer- than their dynamic counterparts. The sound is picked up by a membrane-electrode couple which form a… condenser. The weak current produced must then be amplified to provide a signal within the voltage ranges of audio equipment: this is achieved by the electronics present in the microphone, which will operate via the 48V phantom power supply.
Ribbon microphones were developed from the 1930s. They are the most fragile of the three and generally deliver an output signal of a lower level than dynamics or condensers: for this reason they will often need a preamplifier with a fairly high level of gain (with the exception of ribbon microphones that embed an active preamplifier). Very fragile (shock, wind and other mishandling), they are generally used in the studio
An aluminum ribbon is stretched between two magnets: the vibrations of the ribbon cause the production of the output signal. They produce a very warm sound, characterized by a very strong presence in the bass and low-mid registers, and very set back highs. More modern versions of ribbon mics are able to pick up sounds in a bit more balanced way.
Microphones and applications
Certain types and models of microphones are used by sound engineers in certain contexts: they will produce a sought-after rendering, and accentuate or diminish such or such aspect of the sound. Depending on the type of recording (male voice or female voice, classical or rap song, wind instrument, string, brass, guitar speaker, drums or percussion, piano, close-up or ensemble or ambient recording…. ) and musical genre (blues, folk, classical, rock, metal, etc.), some microphones will be more suitable than others. Over time, some microphones have established themselves as standards for some specific applications or some specific contexts (stage, studio, television, etc.): for example the Neumann U87 is considered as the Rolls Royce of microphones for recording voices and other types of sound sources, the Shure SM58 is the reference for vocals on stage, and the Shure SM57 is the go-to microphone for instruments and amps on stage…
The sound signature of microphones
The essential characteristics of microphones can be summarized with three elements: the directivity, the sensitivity and the frequency response.
The directivity corresponds to the way in which the microphone picks up sounds coming from different directions: front of the microphone, back of the microphone, sides…
The sensitivity of the microphones is more or less important and makes them more or less suitable for certain sound volume levels, and therefore for certain uses. Some microphones have a pad: this generally allows for lowering the sensitivity and avoids overloading the microphone in certain recording conditions.
The design and construction of the microphone are also important elements: the capsule, the magnet or the type and fineness of the ribbon in the case of ribbon microphones, their placement in the body of the microphone, the shape of the microphone, the grille, the presence of a noise absorption foam or not will contribute to give it its frequency response and its behavior.
And in the end, the sound obtained is very directly related to this frequency response and the way the microphone is used, essentially the positioning and the distance from the sound source.
Frequency response is the primary piece of information that microphones manufacturers provide to document their behavior.
Example below with the famous SM57:
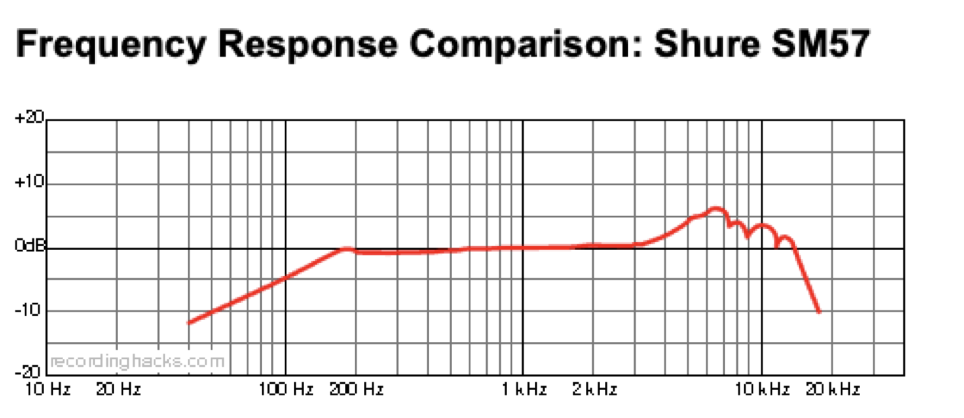
There are several interesting elements here : a serious bass roll-off which starts a little below 200 Hz, a small dropout in the low-mids and a clear accentuation of the treble over the range from 4 to 12 KHz: basically, this is a fairly brilliant microphone ! But the diagram does not tell us how the microphone will react in the bass range, especially with the proximity effect in the context of recordings where the SM57 is positioned very close to the source.
Note: The frequency response charts shown in this article are from http://recordinghacks.com, a great site for microphone specs and reviews.
The proximity effect
This effect describes the bass boost behavior as the mic is moved closer to the source. All microphones are not equivalent in this area and they do not all react in the same way: some microphones are -by design- not very sensitive or not sensitive at all to the proximity effect, others amplify the bass in a very high way (the ribbons microphones, for example), while others are the result of a design intended to limit this effect (the EV RE-20 for example). For the recording of guitar speakers – and therefore by extension the recording of IRs – sound engineers leverage the proximity effect and position the microphone very close to the speaker: very close to the grid or the cloth, at 1cm, 2cm, 5cm, etc. Using cardioid microphones such as the SM57 very close to the source will also make it possible to limit parasitic noise or other instruments bleeds in a live context.
Microphones and sound sources
Some microphones are designed and optimized to record certain types of sound sources, for certain specific situations: they will generally give good or very good results for these use cases. Some microphones are specialized for guitar amps/speakers, vocals, snare drum, piano, drum toms, drum bass drum, etc. Others, on the contrary, are intended to be extremely neutral and transparent, and can be used in many different applications or contexts….
To achieve this, their design brings specific frequency response curves, in order to highlight certain aspects of the sound…. or on the contrary to make them as neutral as possible.
Two examples:
- The Neumann U87 -and its Ai variant- are reference microphones for clarity and precision, used for vocals, voice, piano, orchestras and different types of other instruments… The frequency response of a U87 looks like this :
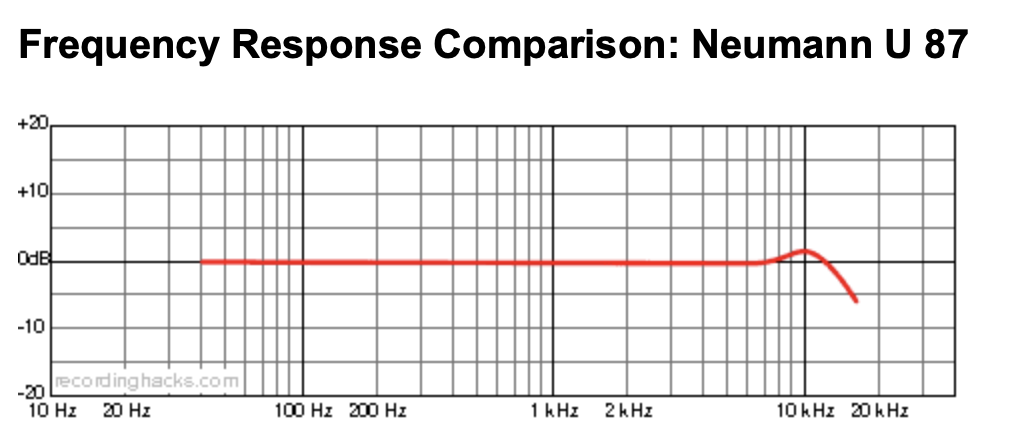
It is basically very flat, very neutral, with just a very slight accentuation of the treble between about 8 and 12 KHz, which will give a little air and clarity to the recording.
- Second example: the AKG D112. This is a mic intended for drum kicks or bass recording. The dotted lines in the diagram indicate the bass boost due to the proximity effect.
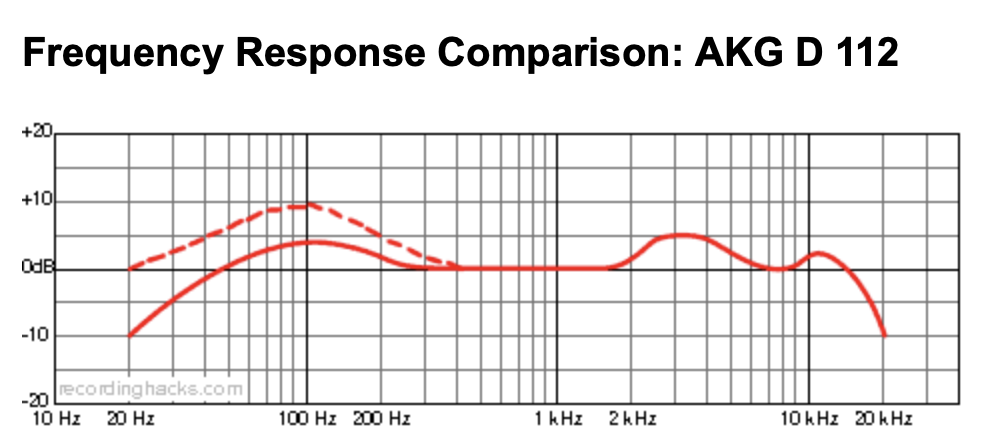
This microphone – like others of the same type – will put the emphasis on two frequency ranges: first it will go much lower than a normal dynamic to capture the basic sound of the drum kick (from 50 Hz to 80 / 90 Hz) or the sound of a bass. Then it will accentuate the treble on two ranges, in order to balance the tone and provide some space for the treble: the main boost is in the 2.5 KHz – 5 KHz range and there is also a presence bump around 11 – 12 KHz. This avoids getting only a dull and muffled sound and this makes it also easier to use and position within a mix.
Whether they are labeled vocals, amp, bass or drums, nothing prevents the use of such microphones to capture guitar sounds, saturated or not. The results can sometimes be very interesting.
The dynamics
Dynamic microphones are capable of withstanding strong sound pressures and are essentially cardioid type microphones, capable of rejecting sounds coming from the side or the back of the microphone: they are particularly suitable for recording guitar speakers. This makes them very interesting for the recording of impulse responses.
Each microphone has its own frequency response curve and sensitivity to the proximity effect: this gives many variations in the rendering. These variations will often be exacerbated in the case of an overdriven guitar: the distortion will amplify the level of resonance in the bass and certain other frequency ranges produced by the cab and the loudspeaker (the distortion of guitar amps, in particular , will generate quite spectacular sound differences, compared to the use of clean sounds, where differences may be more subtle).
In guitar cabinet miking situations, the positioning and the distance of the microphone play an essential role: they impact the levels of bass and the clarity of the recording. In saturated sound, for metal, we will generally look for positions very close to the speaker to increase the bass level, and positions like the cap-edge – at the junction of the central cone and the speaker membrane – for positions that give a ‘good’ balance, or positions further away from the center, for a better placement in a mix and to reduce the very bright tone of central positions.
For guitar cabinets captured by dynamic microphones, one can generally obtain a rather aggressive sound, with a good attack and a good separation of the note, and also good clarity in the chords. They can also produce more or less scooped sounds in the mids: the bass level obtained by the close positioning combined with the treble boosts – which are quite common on dynamic microphones – can produce this type of result quite naturally but it will also depend of the loudspeaker and the cabinet. With certain models of dynamic microphones, you will be able to obtain very scooped tone: kick or bass microphones can produce this type of tone quite easily, like the D112 presented earlier in this article.
Some microphones have become industry standards, and become references to which other microphones are compared, because their sounds are very appreciated and because they are also known and well recognized by many users. Among these reference dynamic microphones for recording guitar cabinets, we can mention:
- The Shure SM57 : probably the most used and copied microphone on the planet
- The Sennheiser MD421, with a wider frequency range than the SM57 and a slightly more delicate usage
- The Sennheiser e609/e906, which are solid alternatives to the SM57
You can find the SM57 graph a little higher in the article.
Here is a comparison between the SM57 and the E906:
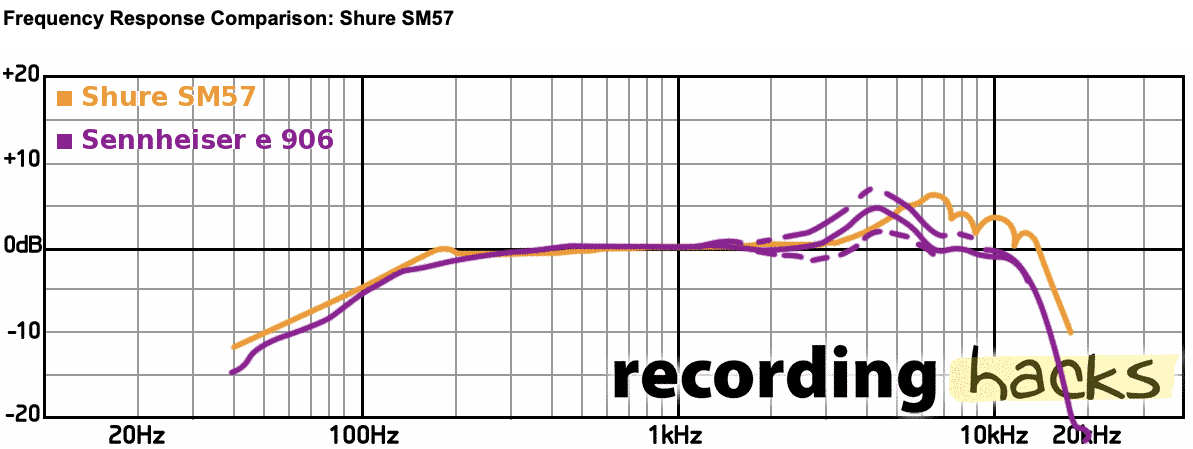
We can see on this diagram two relatively similar curves but the results will be quite different: the 906 “boosts” the treble lower than the SM57, and this produces a slightly less aggressive sound and also a less “open” sound than the SM57. In the end, the 906 produces sounds that are a little more “boxy”, a little less scooped also compared to the SM57 (we are talking here essentially about sounds with distortion).
As mentioned earlier in this article, some microphones are designed for certain applications: while a majority of dynamic mics have a rather limited bass response (roll-off below 100-150 Hz), some of them are -on the contrary- designed to allow a more extensive capture in the bass register.
The SM7B, for example, is derived from the same ancestor as the SM57, but with the aim of reproducing the low register more accurately… (some have called it “the SM57 on steroids”). The SM7B is often used in broadcast, for warm voice rendering, but it can also be used on guitar cabinets….
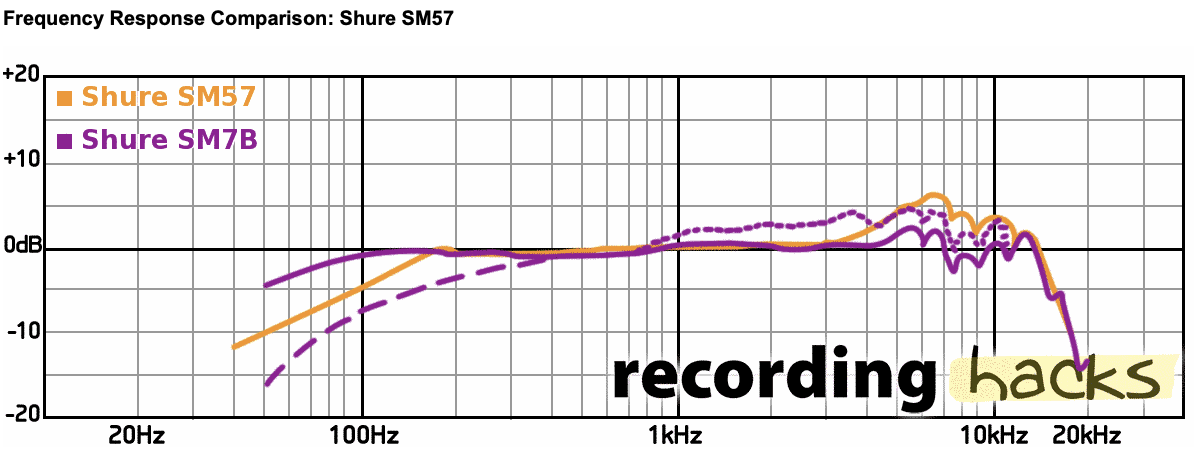
This graph shows strong similarities with the SM57 in the general aspect of the curve, but by default, the bass response of the SM7B is much more important and extended and it is also less exuberant in the treble, which will give the tone a darker feel. The dotted lines represent two settings available on this microphone: a treble boost and a roll-off -or attenuation- of the bass.
Condensers
Condensers can also produce excellent results on guitar cabinets: they are generally more detailed and accurate than dynamics. Two sub-families of condenser microphones exist: large-diaphragm microphones and small-diaphragm microphones. Large diaphragm microphones offer often better reproduction of the low frequencies than their dynamic counterparts.
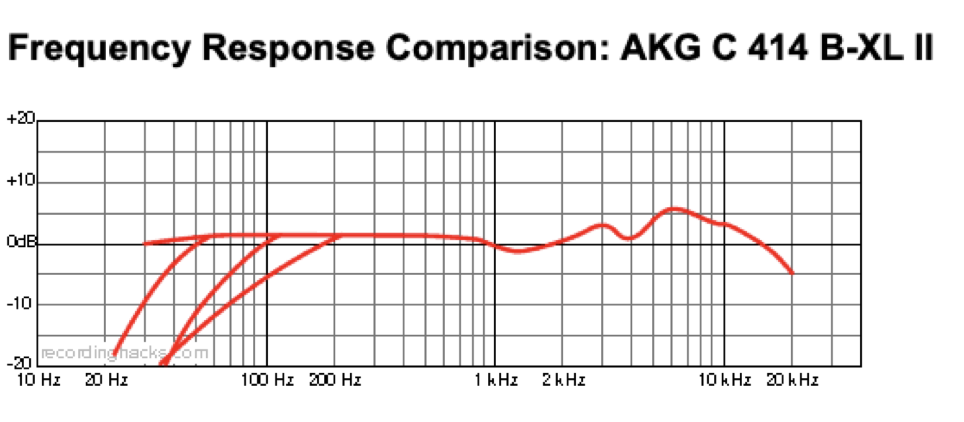
One of the reference capacitors for the electric guitar is the AKG C414:
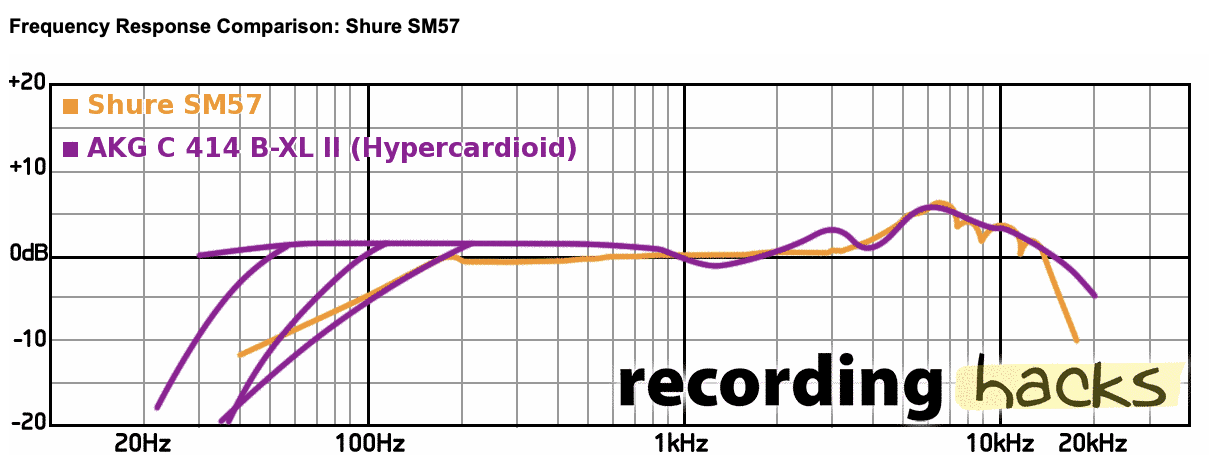
And here is the comparison to the SM57 (below) : again, we can see that the curves are quite similar for the treble part, but the whole bottom of the spectrum (up to 1 KHz) is reproduced at a higher and more extended level on the C414, except if one of the available low-cut options on the microphone is used (40, 80, 160 Hz). Its treble boost curve is also smoother and more progressive than that of the SM57.
In the end, the sound produced by the condensers for capturing high-gain sounds is very interesting: more precise than the dynamics, with a quite different low end (more extended) and with a feeling of scooped midrange which disappears in favor of a flatter or fuller sound. On the other hand, they can also make the sound feel a little more boxy/honky, and a little less open. In summary, a more precise sound, a little bit less colorful, which can often sound less aggressive than a dynamic one, even if it also depends a lot on the positioning used. Please note: these are general indications and there are many different condensers on the market: some may prove less suitable for capturing distortion from guitar amps, with a rendering that is much too bright or with a bass section that is too limited. But note that this is also true for certain dynamic ones
Ribbons
The rendering of ribbons is very different from the one you get from dynamics and condensers: a typical ribbon produces a very dark sound with a very set back treble section- the treble section often drops after 7, 8, 10 or 15 KHz – and a very important bass section. They generally go lower in the bass than the majority of conventional dynamic microphones. Their sound is also generally loaded with bass and the treble is reproduced in a rather “subdued” way: the sound of the ribbons is often described as a “warm” sound. Conventional ribbons are very sensitive to the proximity effect and tend to produce a very high level of bass : they have to be either moved away or corrected with a low cut to obtain a certain balance in the tone. They can also provide very good results with a position farther from the speaker, which will allow you to obtain more balance between the bass, midrange and treble sections.
They are very usable to record high-gain amps: they will greatly reduce the level of aggressiveness in the treble and give a softer touch to the sound. The bass level being generally high, we obtain a sound with good coloration but an attack that is softened, with less clarity and precision. Used in a central position on the loudspeakers and in close miking situations, they can deliver quite scopped tones.
Ribbons generally support equalization corrections very well, either to reduce the bass level, or to increase the treble level and obtain more bite.
The most modern ribbons can offer a slightly more balanced sound, with more present highs and a little less sensitivity to the proximity effect.
Among the ribbons microphones that make reference on guitar speakers, we can mention:
- The Royer R121
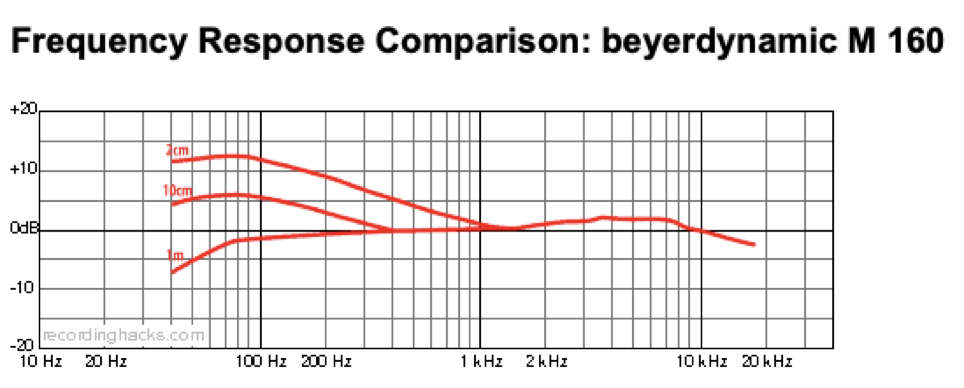
- Beyer Dynamic M160
The frequency response of the M160:
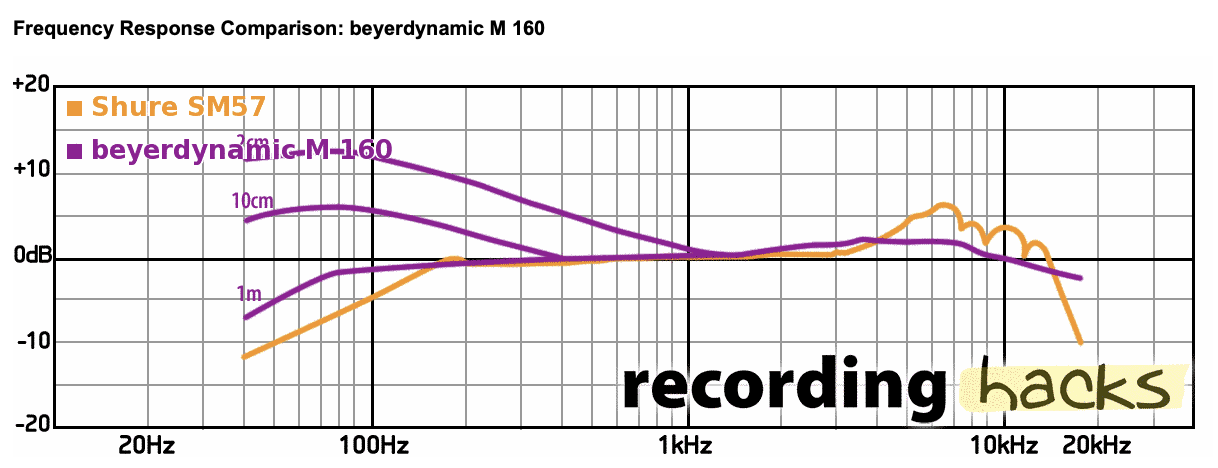
And a comparison to the SM57:
So… what to choose ?
To sum up, take a look at the following diagram:
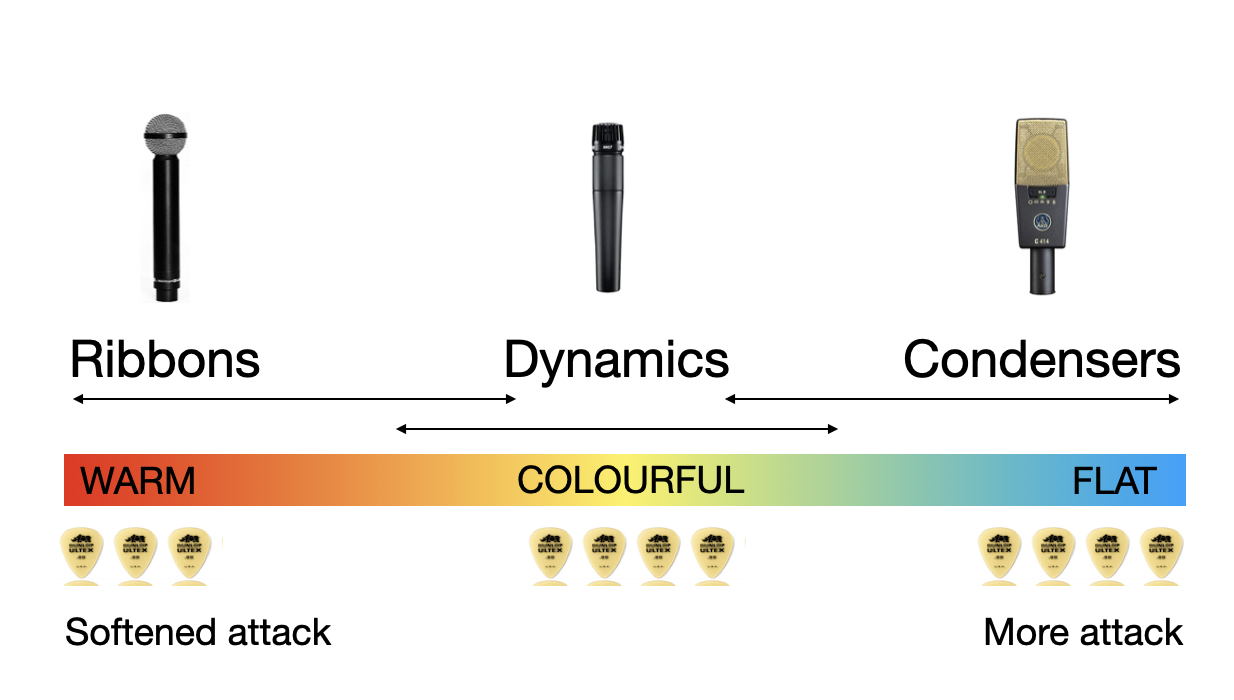
- Condenser: full, detailed, relatively “cold” sound
- Dynamic: colorful, aggressive
- Ribbon: “warm”, treble set back
Note that the arrows overlap because, for certain models of microphones and recording situations (position, distance) the sounds obtained can be quite close. In other words, the sound characteristics of the different types of microphones described here can be more or less marked or more or less obvious depending on the particular models of microphones/speakers/cabinets used and the positioning of the microphones. So take these with a pinch of salt…
To illustrate the differences we can get from the different types of microphones, here is the same intro riff of Holy Diver from Killswitch Engage, in drop C. Based on the Thrasher 01 preset for GE300 (modified for this example), routed to Nadir with IRs from the collection Calif R112. Listing includes 2 sample condensers, 2 ribbons, and 4 dynamic mics.
You can download the GE300 presets here and the IR Calif R112 collection here.
So, which microphones for which uses? Very large and interesting question… 🙂: trust your ears, adjust the tone for your equipment – amps, pedals, …- your preferences, your context, the style, the desired sound atmosphere… and experiment ! You can use the information presented in this blog post to identify and refine certain characteristics of the sounds you get. The tone, when switching from one microphone to another, can be radically different (or when you change from one IR to another one when using IRs): adjust your gain, your tone controls, and your resonance and presence controls – if you have such controls – to make the most of it. The context is essential: within a mix, you will be looking for a certain type of sound in order to place your guitars and obtain the result that seems the most suitable and interesting to you.
And if your IR loader software or hardware allows it, do not hesitate to mix IRs by learning to recognize the characteristics that interest you and shape your sound: you can consult the post ‘IR Part 9: Mixing IRs‘ for more information on this subject.
For more demonstrations and comparison on the tone you can get from different microphones, Youtube hosts many videos on the subject: search for “guitar cab microphone shootout” or “guitar high-gain microphone shootout”.
Continue reading
Previous Post : Impulse responses part 9 : mixing IRs
2022-12-07 at 04:31
Hey, great article!
Always awesome to read good source of information with real facts on the subject. I love the sound of the SM57 (545SD too)! When checking new cabs and IRs, I always go with these around the cap edge position which gives very agressive sounds for rhythm. To smooth things I blend with a m160 or just use it by itself at the “smooth” side of the speaker. To me, it sounds just right at this spot.
SM7b is great at this position too, gives a little different mid range and more balanced response with about the same attack in my opinion.
If the opportunity arrives it would be awesome to know your opinions about guitar speakers as well. We all love V30s but a little info (and tones) on G12Ms, EVHs, G12Hs, Blackbacks and so on won’t hurt.
Thanks for the great work!
2022-12-08 at 09:14
Hey Gabriel, thanks for the feedback and hints ! Yes, one -or more- blog posts exploring guitar speakers is definitely on my to-do list !
David
2025-04-23 at 14:12
Thanks for the great overview of the types of microphones and their sonic qualities. As someone who has played guitar for a long time, I am just starting my journey of learning how to use microphones in front of my cabinet so that I can get a great sound using the proper tools and their combinations. I really enjoyed this series that you wrote. Great work!
2025-04-23 at 17:34
Thank you Myk for this nice feedback
David