Updated March 14, 2021
Introduction
This Chinese maker has become over time an important player in the guitar gear space, with a pretty large offering of guitar effects pedals, with attractive and budget prices but with a good price-performance ratio. Mooer has also an offer which covers multi-effect processors with models such as the GE 300 and GE 200, a large set of interesting preamp pedals or pedals like the Baby Bomb, which is a 30 watts power-amp in a pedal format.
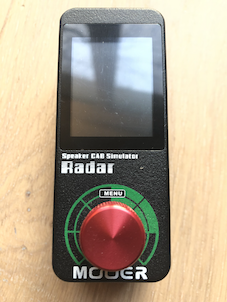
The Mooer Radar was launched in 2017 : it is an impulse response loader in a pedal format. The Mooer Radar surprised and interested a lot of guitar players as it is delivering a lot of features in a very small and compact pedal format, with a very attractive price tag. The pedal offers a small colour screen, and is controlled by a unique rotary / push button.
If you are not into using a Mac or a PC to play guitar or if you are looking for an ultra transportable device to bring your sounds everywhere you go, the Mooer Radar may be a very good option for you…
Mooer Radar : presentation
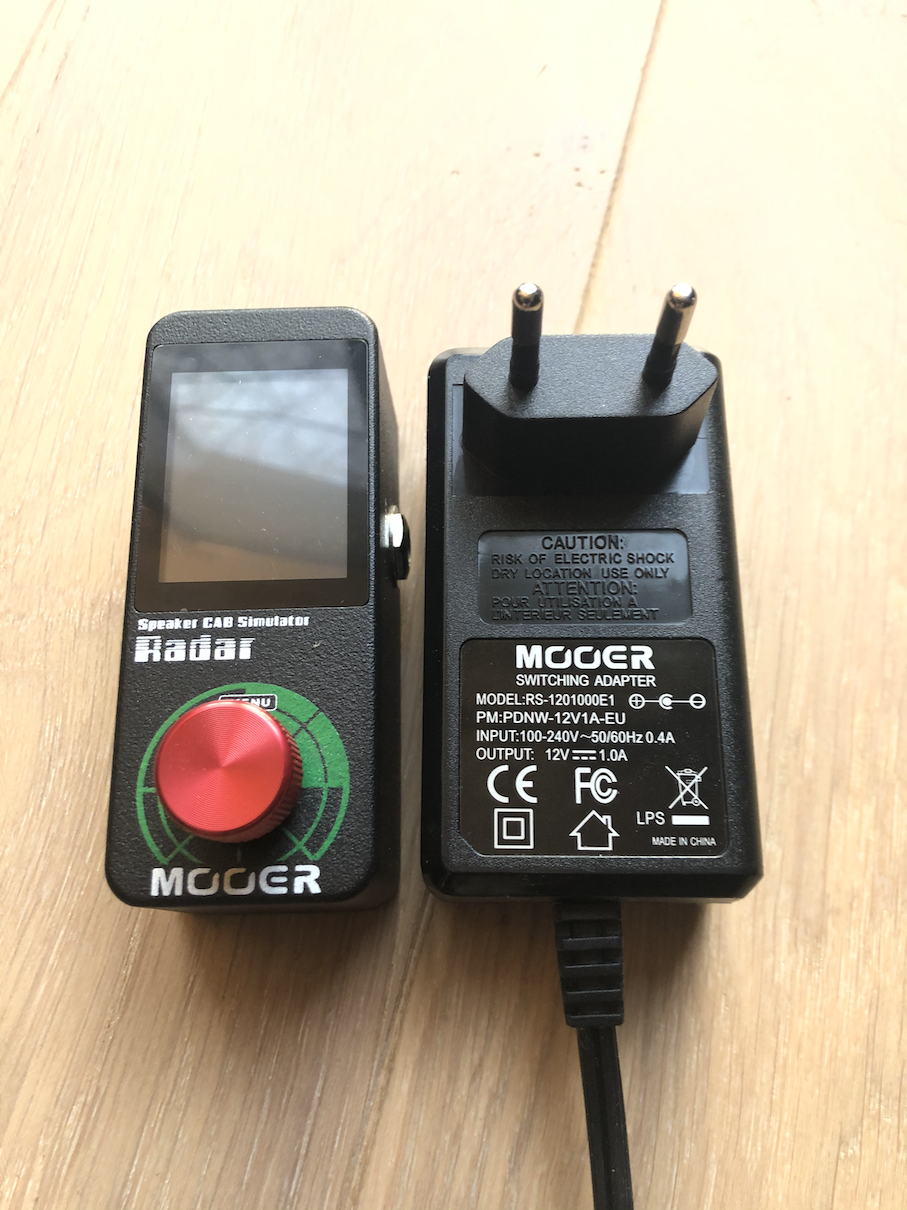
The pedal weighs approximately 150 grams and the box contains :
- The pedal
- The power supply (which is almost bigger than the pedal itself)
The complete description of the pedal and its documentation are available here : http://www.mooeraudio.com/product/Radar-51.html
It can be used by guitar players and bass players.
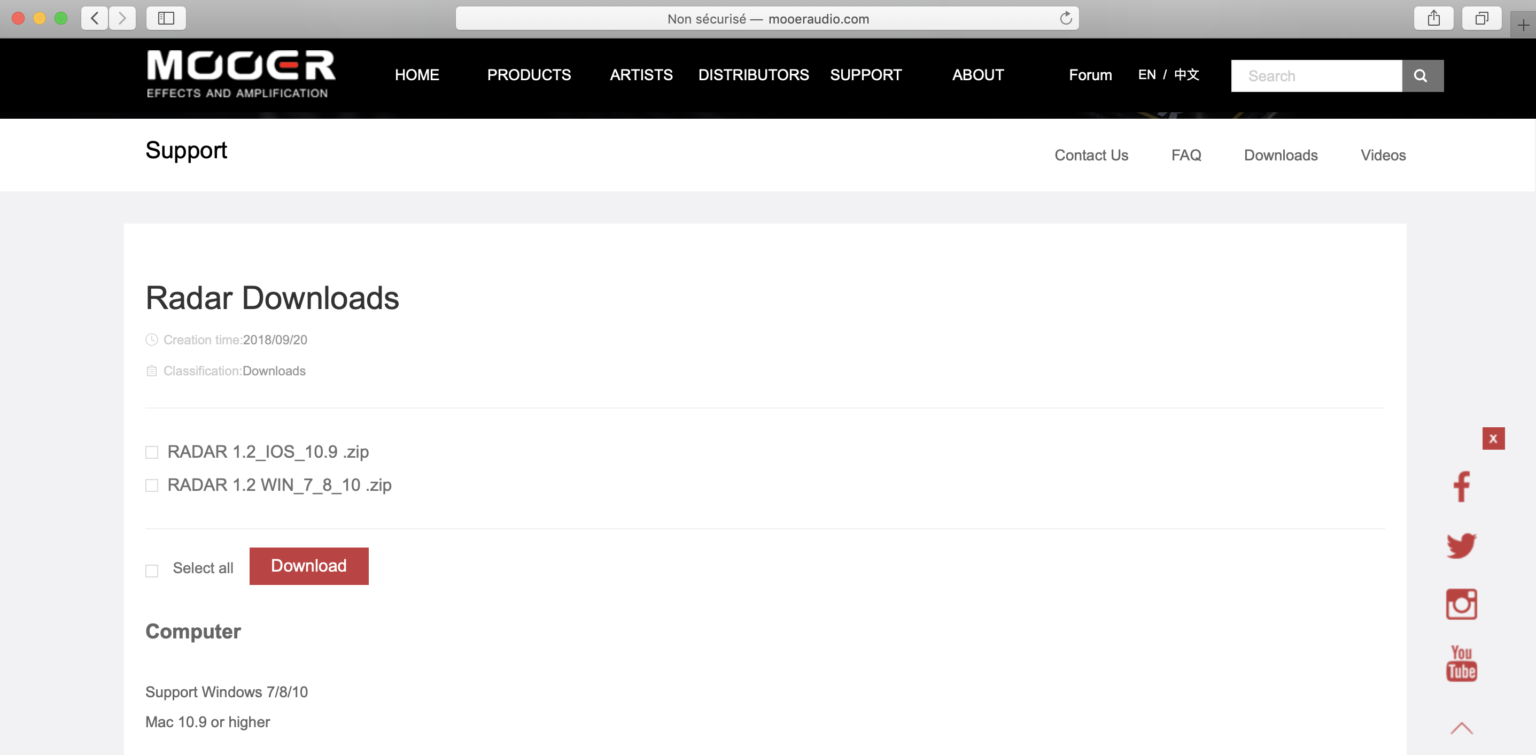
You can also control it from a software running on your Mac or you PC, connected with an USB cable. The software is available in the Download / support section of Mooer’s website http://www.mooeraudio.com/download.html .
The Radar download entry will present you with the different download options:
If your pedal firmware is not up to date yet (latest firmware is 1.2), the Mooer Radar software will allow you to execute a procedure to upgrade the pedal when connecting the two.
The pedal connectivity includes:
- a guitar input jack (6,35mm)
- a jack output for line level out, 6,35 mm jack (470 ohms)
- a headphone out , with a 3,5 mm jack (10 ohms)
- a 12 volts power input (300 ma required by the pedal)
- a micro usb connector for remote control, IR upload and updates (the usb cable is not part of the package)
The technical capabilities of the pedal are the following :
- Sample rate of 44,1 Khz, 24 bits
- frequency response : 20 Hz to 20 kHz
- signal to noise ratio : 100 db
- latency : 2 ms
- IR length : 23,2 ms (1024 points), version 1.0 of the firmware was limited to 11,6 ms (512 points)
The pedal embeds factory defined IRs, and you can upload your custom IRs to the pedal. 36 presets are available, with 30 cab/IR slots.
Connecting the Mooer Radar pedal
This pedal is an IR loader : it brings a guitar cabinet simulator that you can use for practice, for live or for recording. The two screenshots below present an overview of the connections and usage scenarios of the pedal.
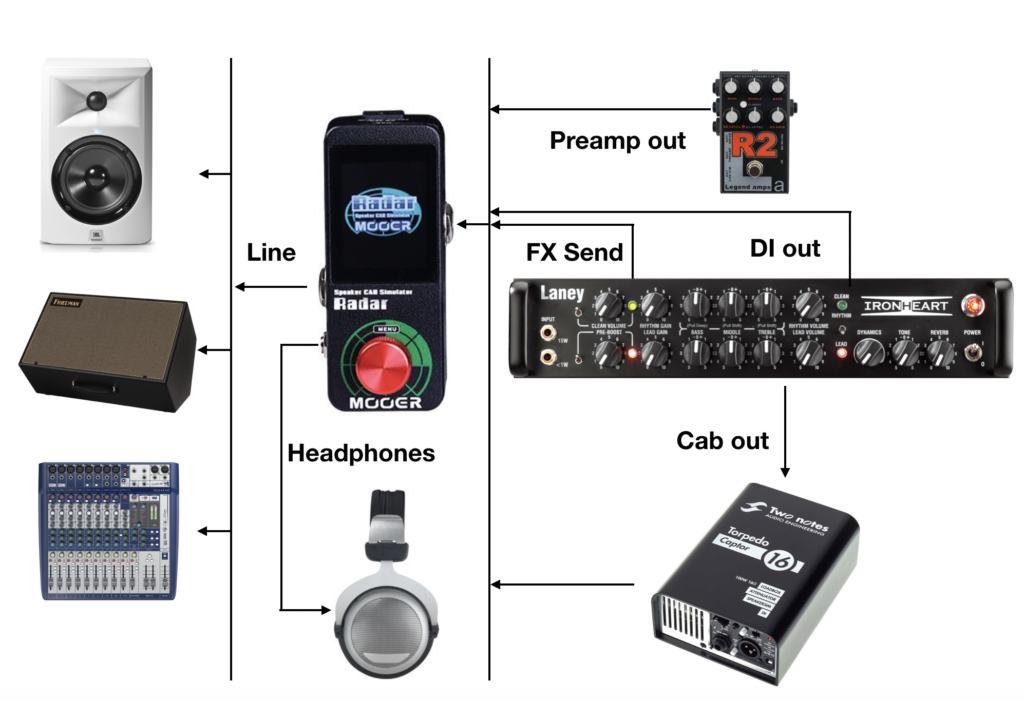
Using headphones only allows for silent playing and recording if you use a preamp/distosion pedal or a load box with your (tube) amp. Please note that the depicted guitar amp is a Laney Ironheart Studio : this specific amp has an embedded dummy load and does not need a load box as such (the Captor load box presented here is redondant for this specific amp but you will need such a load box if you want to route your tube amp output to the line level entry of the Radar and avoid to connect a standard guitar cabinet).
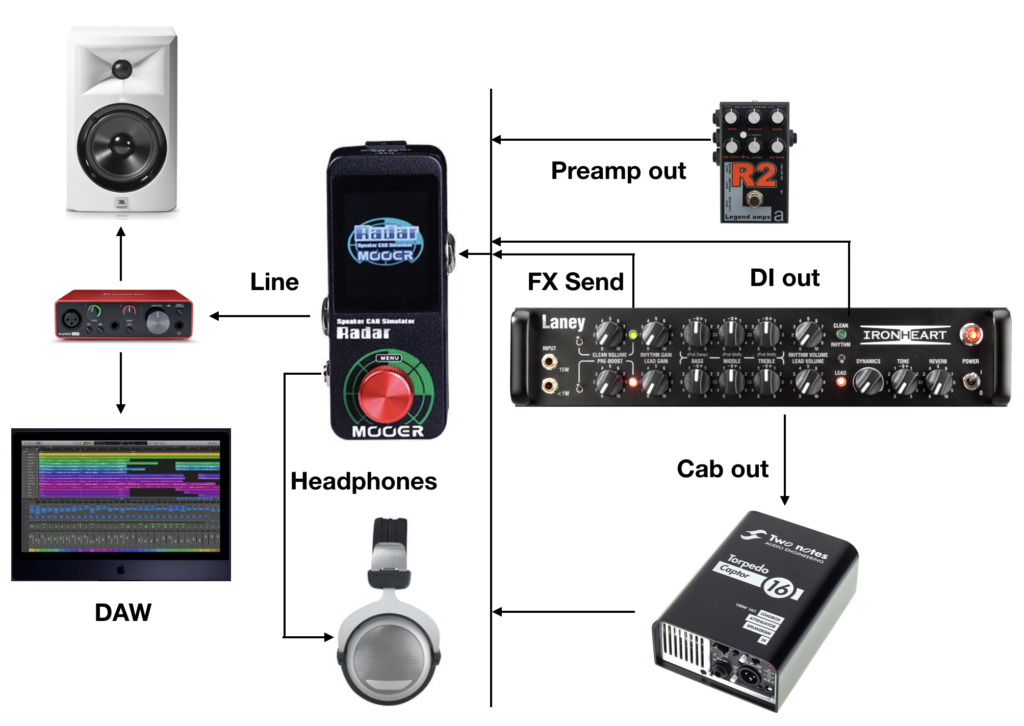
In this second screenshot, we present a scenario where the output of the Radar is sent to a DAW through a sound card : this pedal may be used for tracking, recording or reamping…. While using the Radar pedal for recording will absolutely work, you may also want to investigate the use of a software IR loader for recording scenarios if you already own a DAW. This may provide additional flexibility and possibilities in recording situations.
Get started
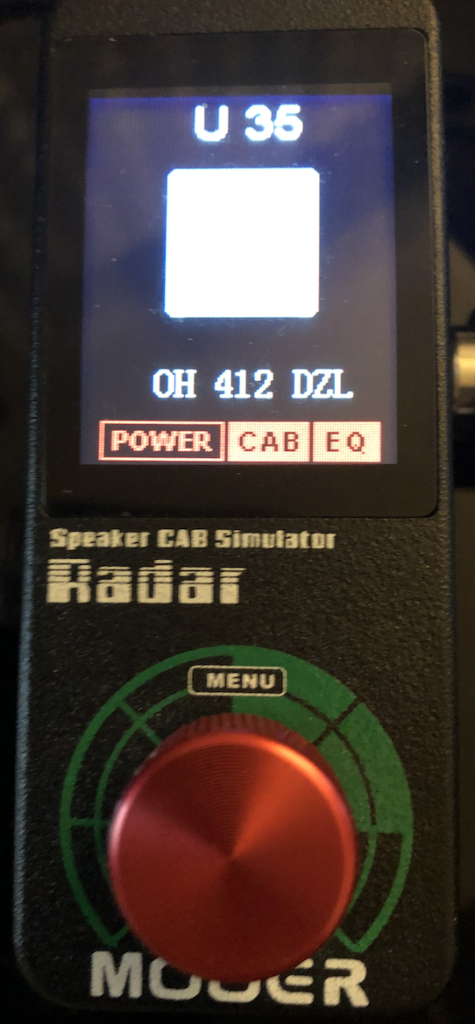
Power on ! It boots in 15 seconds, approximately. The small screen offers a good readability, is quite bright, and is nice to use. The single rotary / push button controls everything.
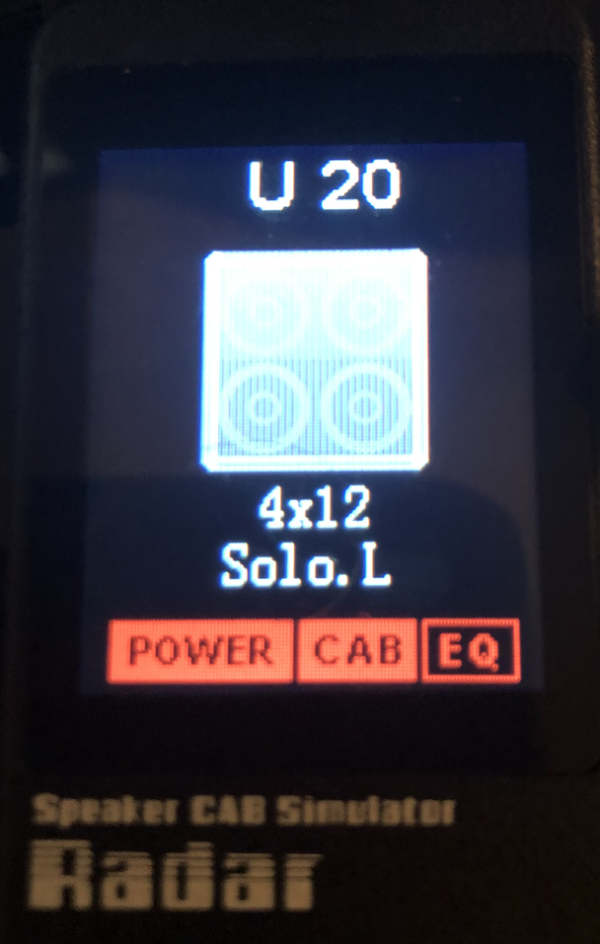
In default mode, the current preset is displayed:
The commands are simple and straightforward :
- on the main screen (preset display), turning the rotary button selects the previous or next preset
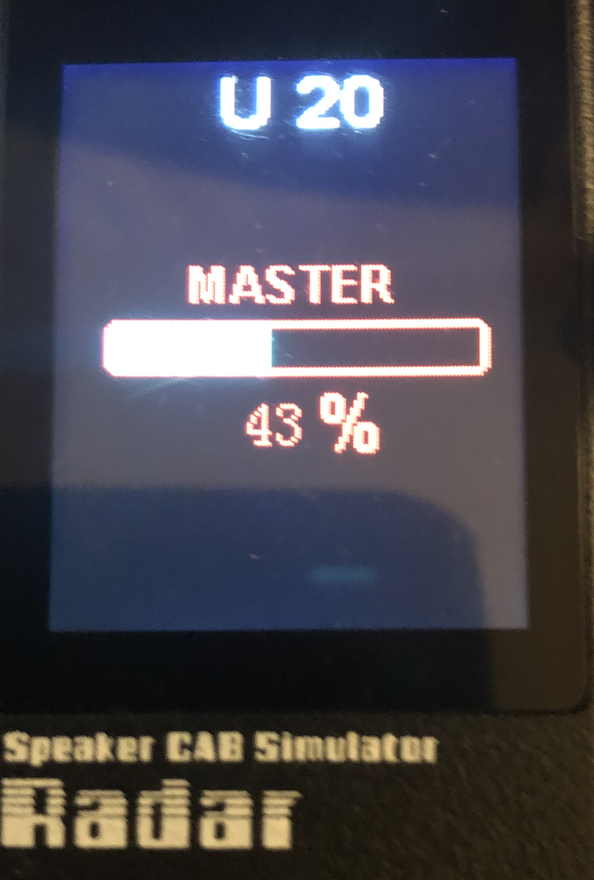
- one brief click selects the master volume setting (main out and headphone). Another click and the pedal goes back to the main display screen
- a longer click enters the preset parameter settings screen
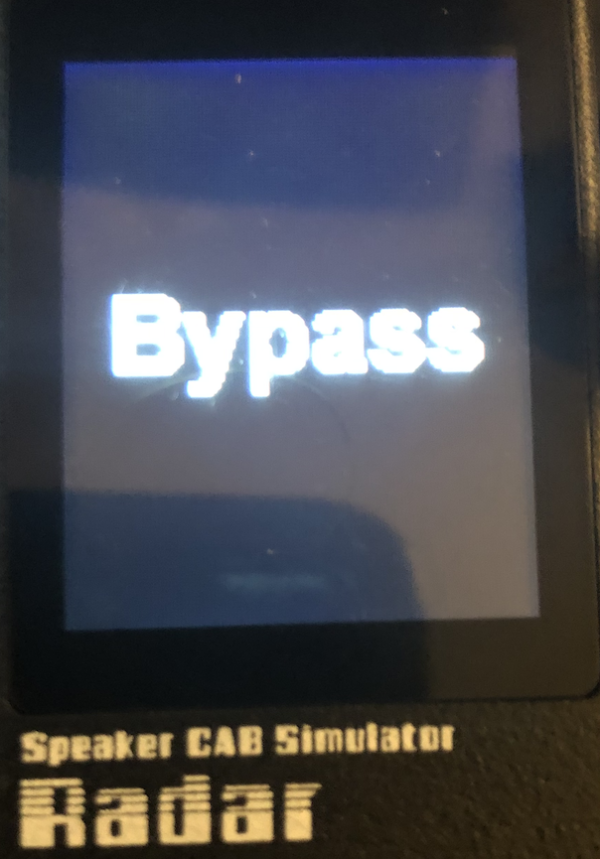
- a long click (3 seconds and more) sets the pedal to bypass. Then, one standard click deactivates the bypass.
When entering the preset settings mode, you will be navigating through 3 screens :
- one for power-amp settings
- one for the cab selection, the microphone selection and position settings
- one for the equalizer parameters
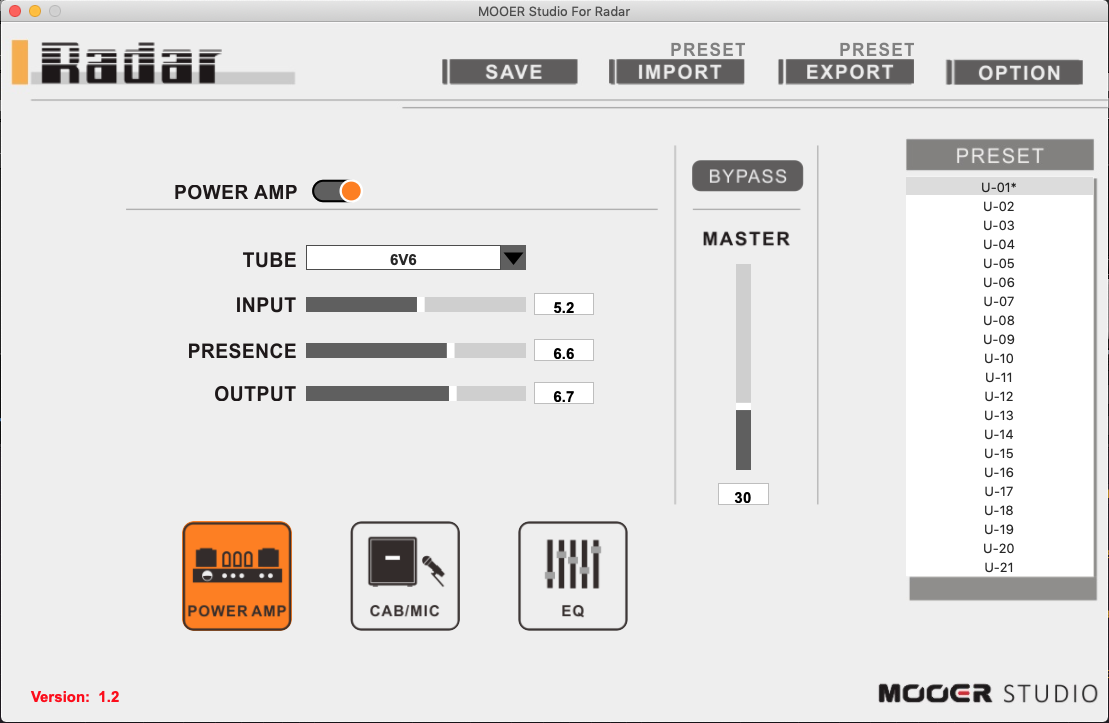
The Mooer Studio for Radar software can help you in the configuration of the pedal : the point and click interface of the software will allow you to navigate faster in the different parameters and configure the pedal in an easier way (less navigation between screens and parameters):
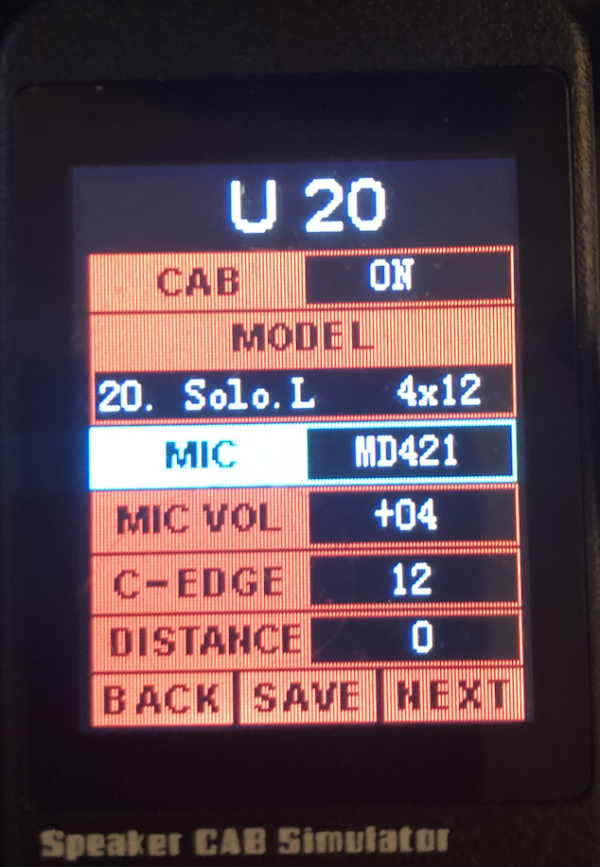
Cabs and microphones
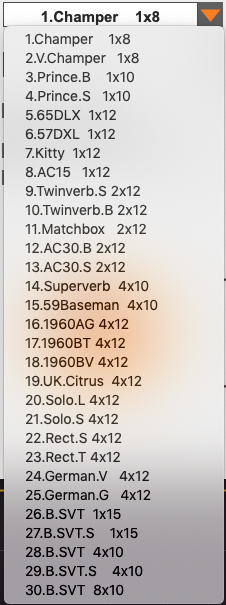
30 cabs are embedded in the pedal firmware. They can eventually be replaced by custom impulse responses.
On the following cab list, the first part is the diminished name of the cab : it is the label that is actually displayed by the pedal.
- Champer 1×8 : Fender Champ Silverface
- V.Champer 1×8 : Fender Vibro Champ Silverface
- Prince.B 1×10 : Fender Princeton Tweed
- Prince.S 1×10 : Fender 65’princeton reverb
- 65DLX 1×12 : Fender 65 deluxe reverb
- 57DLX 1×12 : Fender 57 tweed deluxe
- Kitty 1×12 : Bad cat
- Ac15 1×12 : Vox AC15C1
- Twinverb.S 2×12 : Fender 70’twin reverb silverface
- Twinverb.B 2×12 : Fender 67’twin reverb blackface
- Matchbox 2×12 : Matchless chieftain
- AC30.B 2×12 : Vox V212H Alnico blue
- AC30.S 2×12 : Vox AC30 Jimi212 Silver bell
- Superverb 4×10 : Fender 64’super reverb
- 59Baseman 4×10 : Fender 59’bassman Tweed
- 1960AG 4×12 : Marshall 1960A Green back
- 1960BT 4×12 : Marshall 1960B G12T-75
- 1960BV 4×12 : Marshall 1960B V30
- UK.Citrus 4×12 : Orange ppc412
- Solo.L 4×12 : Soldano 4×12 Lucky
- Solo.S 4×12: Soldano 4×12 Slant
- Rect.S 4×12 : Mesa boogie recto standard
- Rect.T 4×12 : Mesa boogie recto traditional
- German.V 4×12 : Diezel Rearloaded V30
- German.G 4×12 : Diezel Rearloaded G12-65Heritage
- B.SVT 1×15 : AMPEG SVT 15E
- B.SVT.S 1×15 : AMPEG SVT 15E (Subkick)
- B.SVT 4×10 : AMPEG SVT 410HE
- B.SVT.S 4×10 : AMPEG SVT 410HE(Subkick)
- B.SVT 8×10 : AMPEG SVT 810E
The available microphones include some of the most classical ones : Shure, Sennheiser, Neumann…. I discovered a few microphones there for the first time, as I had never had before the opportunity to use IRs based on Rode, Marshall and AKG microphones :
- Sm57 : Shure SM 57 Dynamic
- Sm58 : Shure SM 58 Dynamic
- Md421 : Sennheiser MD 421 Dynamic
- Md441 : Sennheiser MD 441U Dynamic
- U47 : Neumann U47
- U87 : Neumann U87
- RodeNT1 : Rode NT-1
- MXL2001P : Marshall MXL 2001P
- MXL2003 : Marshall MXL 2003
- C3000 : AKG C3000
- C4000B : AKG C4000B
I really enjoyed the balance of the U47 and U87 for metal sounds !
For metal heads and rock players, the cabs of interest are, IMHO :
- Marshall 1960A Green back
- Marshall 1960B G12T-75
- Marshall 1960B V30
- UK.Citrus 4×12
- Orange ppc412
- Soldano 4×12 Lucky
- Soldano 4×12 Slant
- Mesa boogie recto standard
- Mesa boogie recto traditional
- Diezel Rearloaded V30
- Diezel Rearloaded G12-65Heritage
These factory cabs are globally good, and recorded in a neutral – flat mode : they will allow your amp or preamp signature to go thru and be correctly transcribed or, let’s say, reproduced. Take this with a pinch of salt : I tested the pedal only with distorted sounds and I mainly used the metal cabs. The cabs globally do not sound overly harsh, though the LPF is often set to a relatively low value in the presets (5 Khz).
The microphone position can be set with two parameters :
- C-EDGE : from 0 (center) to 30 (cone edge)
- Distance : from 0 (nearest) to 50 (farthest)
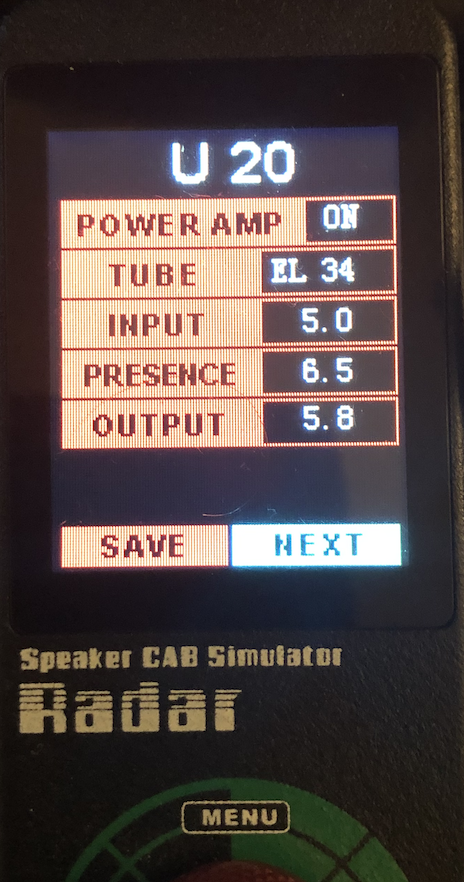
Power amps
4 power amp simulation are available, 2 for an American sound, 2 for a more Bristish type of sound :
- 6V6
- 6L6
- EL34
- EL84
Three parameters allow you to adjust the power-amp simulation (level and bandwidth of the effect) :
- input
- presence
- output
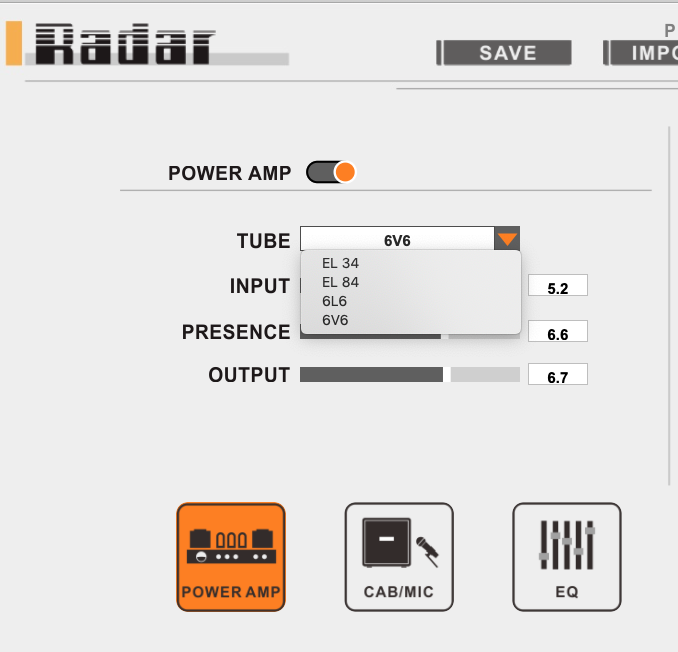
In my experience, the power section is a must have and must use with this pedal, especially if you are using an amp FX Send connection or a preamp pedal. These power-amp simulations are actually simple to use and give great results. This section is quite critical in the overall sound, and you will get the best of the provided cabs by tweaking these parameters a little bit. This section defines as well the overall volume of the signal that will be sent to the next sections of the pedal : cab/mic and eq.
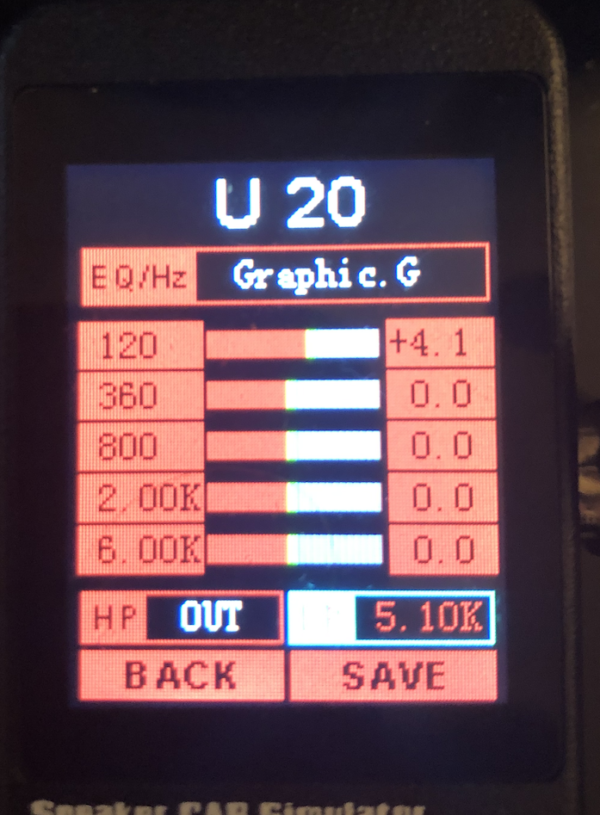
The embedded EQs
Three equalizers are available :
- a guitar graphical equalizer (5 bands)
- a bass graphical equalizer (5 bands)
- a parametric equalizer (4 bands)
The equalizer section can be turned off (by the way the power-amp section can also be turned off). You can adjust the frequency bands and you can add or remove 15 db. On the parametric equalizer, you can modify the Q factor.
Two filters are available as well, which is really nice :
- HP : it is the high-pass filter, it can be turned off or set between 0 and 500 Hz
- LP : it is the low-pass filter, can be turned off as well or set between 20 Khz and 3 Khz
The slope is not mentioned in the Mooer documentation
A few samples with factory IRs
Edit April 09/2020 : listening back to the first samples I recorded with the pedal, I figured out that something went wrong in the original recording process. So I changed my recording setup and managed to get samples which are actually way closer to the sound produced by the pedal.
The following samples are captured with the following signal chain :
-Guitar – Maxon OD9 – Revv G4 blue channel – Mooer Radar – sound card – Logic ProX. No processing in ProX, excepted an HPF on some of the samples.
Based on preset U-19 : UK Citrus, MXL2001P, EL34
SD JB pickup, C tuning
Based on preset U-19 : UK Citrus, MXL2001P, EL34
BKP Miracle Man, Drop A#
Based on preset U-21 : Solo S., C3000, 6L6
BKP Miracle Man, Drop A#
Based on preset U-23 : Rect.T , U47, 6L6
Micro BKP Miracle Man, Drop A#
Based on preset U-24 : German.V , U87, 6L6
BKP Miracle Man, Drop A#
Based on preset U-25 : German.G , U87, EL34
Micro BKP Miracle Man, Drop A#
Based on preset U-25 : German.G , U87, EL34
SD Custom Custom (SH-11), D tuning
Based on preset U-25 : German.G , U87, EL34
Last sample is the intro of Half Light by Doom:vs (Johan Ericson) (https://www.youtube.com/watch?v=A7bT4S9SNtk), B Tuning, Fusion Edge 7, OD9, Revv G4, Reverb from TH3
Using third party IRs
Uploading 3rd party IR can be done by using the Mooer Studio for Radar software : on the Cab section, clicking the “+” button allows for IR upload, and the “-” button reverts the slot to the factory IR. I have been able to test an IR from OwnHammer Heavy Hitters pack and one of my own IR (50 ms) : the Mooer software has probably truncated the IRs to 23 ms but they ended up uploaded on the pedal. I did not perform extensive tests on this : contact and check with your IR provider in case of doubt.
IR Ownhammer Diezel 412 V30 SM57, Revv G4, SH-11 :
The two next samples are using Overdriven.fr IRs that you can download from this website (check the Resources / Impulse Responses Download section).
IR Overdriven.fr German E112 G12K100 E906, Revv G4, SH-11 :
IR Overdriven.fr German 112 G12T75 , Revv G4, SH-11 :
Conclusion
The pedal is simple to use and provides a pretty good sound quality for the price. The default cab selection provides some good IRs for metal guitar players.
A few points worth noticing :
- Mooer does not provide information or software to create IRs in the pedal format (or I was unable to find it) : only classical 3rd party IRs can be used. A custom IR is then using a slot that is actually able to handle mutliple IRs in the Mooer format (at least more than 11 given that you can have up to 11 mics and multiple positions). Being able to create IRs in this format would allow users to take advantage of the limited number of slots…
- A far as I know, there is no Mooer IR store, and no 3rd party IR available in Mooer format
- There is no preset volume control, only a master volume : some users may lack this feature, as switching from IR to IR (mic to mic, cab to cab,…) can drastically change the output volume : watch out and protect your ears when playing with headphones.
- A real-time level meter would be welcome : you have to adjust your levels by ear. The screen will display a saturation symbol if your signal overload the pedal (and you will notice it, anyway, as the signal will clip)
The Mooer Studio does the job, but remains very simplistic, the UI is minimalist and the ergonomics could be a little bit better. A few minor bugs here and there : some reversed up/down controls or the inability to enter directly a value for the HPF and LPF.
A few other points :
- Import / export of presets work but do not embed the IR
- IR names are truncated to 10 characters : rename your IR files or write down which IR you uploaded to which slot
- The power-amp section is critical to get a good sound from the pedal. It works well and does a pretty good job : it will be handy when using preamp pedals connected to the Radar.
An ultra compact pedal with a very decent sound quality for the price, together with a good set of features (power-amp, mic placement, equalizers) : you will have no excuses to not start using IRs !
For information, the pedal price (at the time of the initial writing of this review ) :
- PourLesMusiciens.com : December 2019, https://www.pourlesmusiciens.com/mooer-radar-speaker-cab-simulator_143122.html, 125 Euros
- Thomann, December 2019, https://www.thomann.de/fr/mooer_radar.htm, 125 Euros
Change log
- Created December 2019
- Updated April 10, 2020 : re-recorded demos
- Updated September 7, 2020 : added connection diagrams
- Update March 14, 2021 : a few typo corrections
2023-01-16 at 12:56
Hello,
Thanks for the very useful info you provided! I got a question; my chain is guitar-tube amp-load box-Radar.
I’m still experimenting with the pedal, but so far I haven’t obtained very satisfactory results. With my configuration I guess I can disable altogether the PowerAmp and EQ section, and use the Radar only as an IR loader, can’t I?
Roberto
2023-01-16 at 23:48
Hello Roberto,
Yes, absolutely : when using a load box in between, you are getting the full output signal of your tube amp so it already has some power tube color and the power-amp sim should not be used in the first place in that configuration (as you are adding extra coloration on top of your signal and that is probably too much…). You can still use the EQ if you want to further tweak the tone you get….
Hope it helps
David
2023-01-23 at 08:46
Hello David,
Thank you for the clarification. I erroneously thought that the Eq section was referred to the preamp stage, instead I understand it is a post equalization, let’s say on top of the signal that is ‘captured’ by the virtual microphones inside the cab simulations.
2023-04-24 at 16:21
Been super interested in this pedal for running direct live. I can’t find a clear answer anywhere online regarding if I need to run the radar to a direct box on stage and THEN to the pa? I’m used to going direct with an XLR and DI box. I see this pedal only has 1/4 inch output. What is actually needed to run direct if the radar is my last pedal on my board?
2023-04-26 at 20:59
As far as I know, the output of the radar is a line level output. So I think you can send it directly to a mixer. Consider eventually a split if you want to send it to a stage FRFR cab and a mixer.
David