Neural Amp Modeler is a solution capable of providing us with sounds of very high level of fidelity to the captured gear : the models reproduce the frequency response of the gear, as well as its behavior in terms of gain, saturation, compression, etc. And the essential parameter for the implementation of a NAM model is the gain level with which you enter the model: with the appropriate gain level, the model will react faithfully to the original and will precisely reproduce the behavior of the gear, for a given intensity of the input signal…. NAM being very precise, it can offer you an experience of this kind: “how does my guitar sound with a Revv 120 Purple channel, how does it sound in a 1992 Vox or in a real Dual Rectifier?“.
In order to achieve this, you have to go through a small series of step which consists of ensuring that you enter the model with the expected gain level: this third part is therefore covering gain staging, a practice which consists of ensuring that you use the optimal settings at the level of your audio interface and the plugin loading the NAM model in order to obtain the most faithful rendering, using the gain level expected by the model.
Note / disclaimer: you may absolutely adjust your signal chain by ear and not take into account the information presented in this article, but if you want to have a realistic starting point, or if you find that the sound you are getting is not satisfactory – for example not enough or too much gain – or if you are simply curious about the “real” sound that you get with this or that equipment, then the small steps below will allow you to calibrate your NAM signal chain. As a bonus and to test this aspect on your own equipment, you will find a download link for a small companion pack of NAM models.
« 0 dB input gain » ?
You may have followed the “0 dB input gain” debate on YouTube, and you may have watched this video by Ghost Note Audio titled: “Ampsims and input gain – Please, stop the madness…“. The video is very interesting and… 100% accurate. In short, the author denounces the practice of 0 dB input gain—recommended by some YouTubers and even some plugin publishers—as bad practice and presents the steps of gain staging for guitar amp simulators used standalone or as plugins on PC or Mac.
Indeed, as there is no standard in the digital world to define the input level of plugins – and in particular for guitar amplifier simulation plugins -, these can vary and it will be necessary to turn to the plugin publisher and check if this input level is specified in the documentation or failing that try to ask the support / after-sales service. Basically, we want to know for what input value the plugin is calibrated. Knowing this input level allows the user to adjust its gain in order to enter the plugin with the level intended by the developers and this in order to make it sound as it is designed to sound… This level can be expressed in dBu (which correspond to a voltage) and not necessarily in dBFS, the working unit in the digital world (where 0 dBFS is the highest value of a sample).
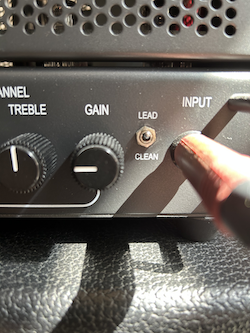
On the other hand, and to complicate matters a little, the Hi-Z inputs of audio interfaces have sensitivities and usable gain levels that can vary significantly from one manufacturer to another, or even from one model to another. This information is most often provided by the manufacturer of the audio interface under the name “Maximum input level” or “Maximum Input Level at minimum gain“. For an Apollo 8x, this value is +12.4 dBu, for an SSL2+ interface it is +15 dBu, for a Scarlett 2i2 3rd Gen it is +12.5 dBu, for some RME interfaces this level is switchable between different values.…
This value represents the available headroom on the analog side: when we reach this value (by adding or not gain with the gain potentiometer), we reach 0 dBFS on the digital side, i.e. the maximum value and we cause clipping. The consequence is that for a given analog input signal and with a gain set to 0, a +19 dBU interface will produce lower values than a +12 dBu or +10 dBu interface. However, this is not really a problem since the gain adjustment is there precisely to allow us to bring our input signal to a “correct” level (we deliberately use this term at this stage). But by doing this blindly and without any reference, we do not control the signal level to bring it into the range expected by a plugin.
The screenshot below shows a Seymour Duncan SH-4 recorded on a TwinX interface (+12.2 dBu) on the top track and the same input signal on an SSL2+ (+15 dBu) on the bottom track, with gain at 0 for both interfaces.… For better display both tracks are amplified by 6 dB in the DAW:

Note that the volume of the signal captured on the TwinX is higher than on the SSL2+: thus, for a gain level remaining positioned at 0 on each of the interfaces, the two interfaces will produce a different volume on the digital side for the same analog input signal level. A +19 or +21 dBu interface will therefore be “cold”, and conversely a +10 dBu will be “hot”. And this also means that with this practice, and by staying with the input gain at 0, a TwinX owner will enter a plugin or a NAM model with more gain than an SSL2+ owner, but in both cases, it is likely that this will not exactly be the level expected by the plugin or, in our case, the level expected by the NAM model.
Furthermore, recording instrument tracks with the gain set to 0 is not recommended, as this will not achieve the best signal-to-noise ratio. On the contrary, it is advisable to increase the gain to bring the signal into a range—say—between -9 and -6 or even -3 dBFS*, while avoiding clipping.
Note(*): there are different points of view on this subject, some will recommend keeping a little margin, others will advise setting the gain as high as possible without clipping. The idea is to increase the signal level to make the analog-to-digital converters work as well as possible and optimize the signal-to-noise ratio. Practices and recommendations in this area can therefore vary slightly from one context to another.
To order to produce the expected level into an amp simulation, we will use gain staging by:
- calibrating the plugin’s input level with the plugin editor’s specification and the sound card’s maximum input gain.
- then—starting with gain at 0—we’ll increase the input gain on the audio interface to bring the signal into an optimal range and lower the digital plugin’s input level accordingly, maintaining unity gain.
You’ll find a link to a spreadsheet in the Ghost Note Audio video that contains plugin calibration specifications and the maximum input values for many sound cards. For example, you’ll find the calibration value used by the Neural DSP developers for plugins (which is 12.2 dBu).
And in the case of NAM, it is not the plugin that specifies the expected entry level, but each model.
Gain staging with NAM
With NAM, the model is calculated from a re-amped input file. This model reproduces the gain behavior of the target system, within a certain range and up to a certain level (we’ll discuss these aspects again in a future article in this series). The level used for re-amping defines the model’s gain range: using this information to calibrate the NAM system allows the model to deliver results very close to those of the analog system. This means that by using the same input material—i.e., the guitar—the result produced by NAM becomes extremely close to the real hardware (amp, pedal, etc.).
To achieve this level of results, the NAM system is calibrated in two main steps:
- Using the calibration value provided by the model creator AND the Maximum Input Level specification of the sound card
- Adjusting the interface’s input gain and the NAM plugin’s input gain
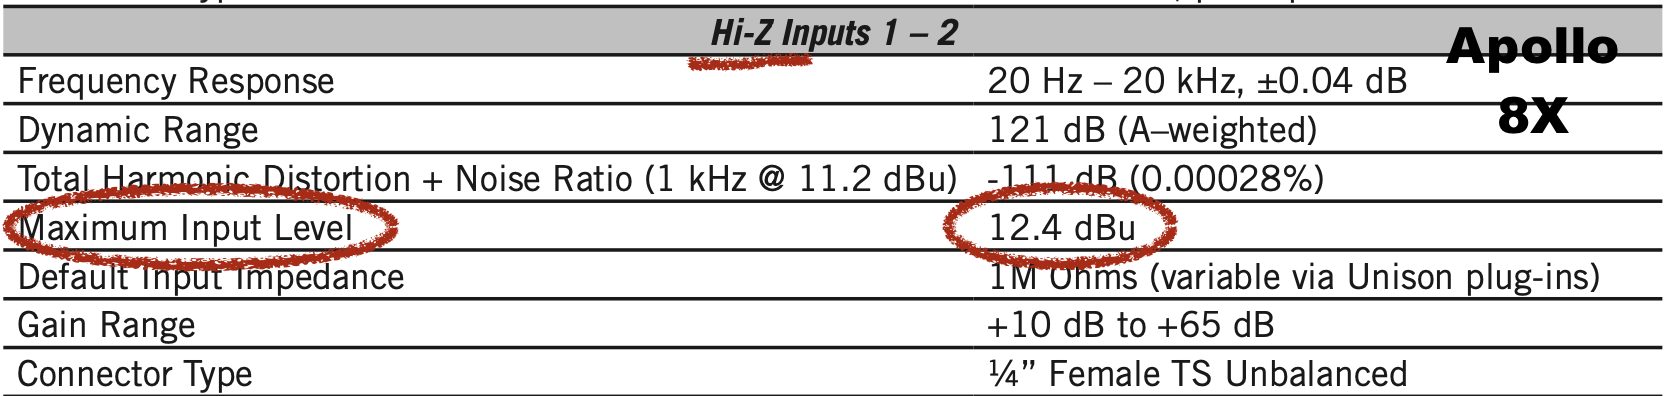
For a NAM model, the calibration value corresponds to the dBu level used for re-amping:

The calibration procedure is described here in the NAM documentation: https://neural-amp-modeler.readthedocs.io/en/latest/tutorials/calibration.html: it covers the gain and volume sections of the model (this aspect will be covered in another article in the series).
You will find the calibration value on Tone3000 in the model descriptions: be careful, they are not always provided by the model creators:
If this value is not provided, it is not possible to accurately calibrate your system: you will have to adjust the various levels by ear and feel.
Since version 0.10.0, the system allows you to specify the calibration value in the model metadata: https://www.neuralampmodeler.com/post/trainer-version-0-10-0-is-released. NAM models can therefore include the calibration in the following form:
“input_level_dbu”: 12.0
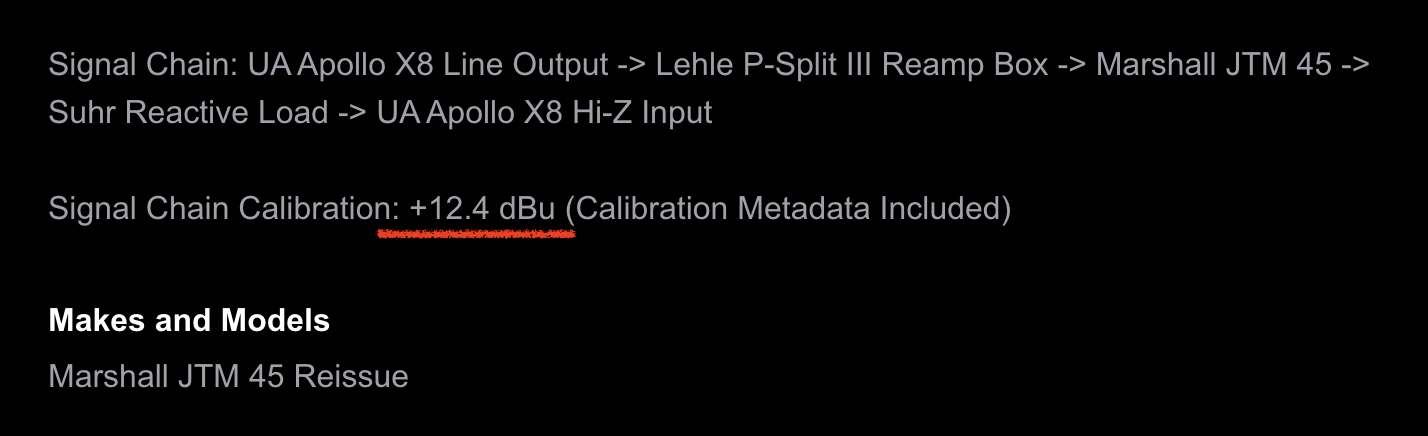
Tone3000 models that include this calibration data can be searched using this criterion on the website:
In practice, we’ll use this value with the interface’s maximum input level as follows:
- Set your interface’s gain to 0
- Set your NAM plugin’s input gain to [Maximum Input Value – input_level_dbu]: for example, 12.2 – 15 = -2.8
- Increase – if necessary – the input gain for your instrument input to bring it into an optimal range. For example: let’s say we add 5 dB
- Decrease the NAM plugin’s gain by the same amount, in our example: -2.8 – 5 = -7.8
- Test: you’re at the gain level expected by the model and the model sounds identical to the original hardware
- From there, you can make any adjustments you want, if you feel the need: raise the gain, lower the gain, add a boost, a drive, etc.
This last step is not always mentioned in the various videos and articles that we find on the subject: the model may not sound as you would like – even if calibrated to perfection – with your guitar and your pickups, in your context it may have too much gain or not enough; it may be too bass heavy , etc… and it can also depend on the associations that you will make: for example the IRs that you choose to associate with a NAM amp model. So do not hesitate to tweak or change the model for another with more gain or less gain…: by following this procedure each time, you simply start from a realistic starting point…
Automatic calibration
Since version 0.7.12, the NAM plugin offers automatic calibration that supports step 2. To make it work, it is necessary that the calibration metadata is included in the model and you need to enter the maximum input gain of your interface:
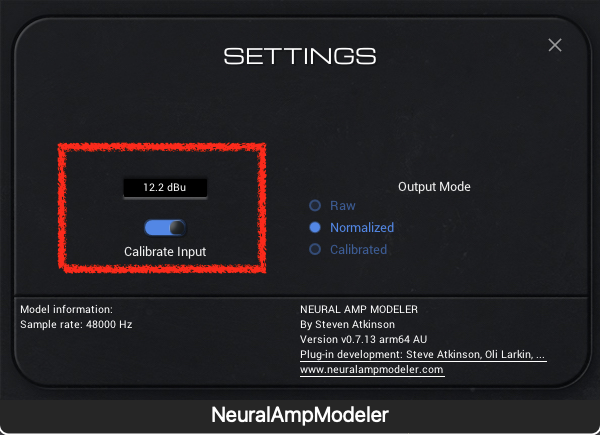
Note: on my Mac, in my configuration, it’s impossible to enter the value directly in the plugin interface (bug). To work around this, type “12.2 dBu” (i.e. the value of YOUR interface maximum input level) in a text editor and copy this text to the clipboard, then in the plugin interface: right-click on the input field, then “paste” from the menu.
On the gain side: in this case, the gain remains at zero (before compensating for any adjustments you make to your input).
Audio examples and a model pack
It’s not necessarily easy to understand and test this approach when you only have a single sound card and don’t have the target gear as reference. So, I came up with the idea of offering you a NAM model pack that includes three models of the same amp, captured with the same gain and tone settings but with varying re-amping levels. The precise re-amping levels are included in the model metadata and are listed below: you can test them with a fully manual gain staging procedure or by activating the “input calibration” option if you’re using the NAM plugin version 0.7.12 or later.
The different models are all based on the Lead channel of an MT 15, gain at 3, bass at 6, mid at 4, treble at 5, presence at 6. This is an “amp head” model, so you’ll need to associate an IR with it. In the playlists below, the cab used is a Two-Notes cab loaded into Genome (an Engl 412), positioned after the NAM plugin that is used to load the models. Originally, the pack was supposed to include 4 models, but I excluded the 18 dBu model for the purposes of illustrating this article (this is explained a little further down). The 18 dBu model is, however, included in the audio examples.
The reamping levels are as follows:
- 5.74 dBu (which we’ll refer to as “6” in the following paragraphs)
- 11.76 dBu (which we’ll refer to as “12”)
- 15 dBu
- 18 dBu
The guitar used in the examples is equipped with a Seymour Duncan SH-4 bridge pickup. In the audio examples provided, I used the calibration but kept the input gain level at zero (a bad practice, then) because this made it easier to control and describe the calibration values used. All the examples in these playlists have been normalized to -10 dBFS, and are best listened to through monitors or headphones.
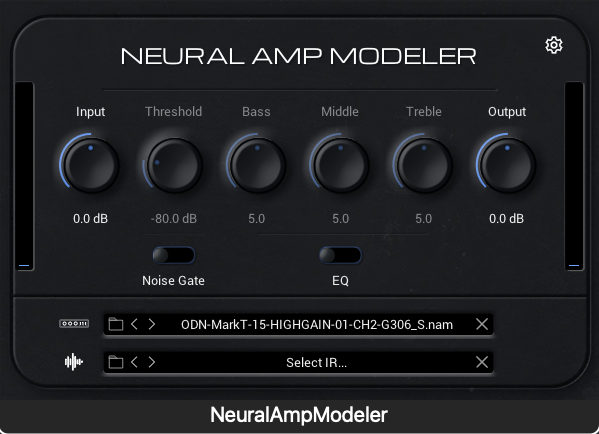
In the “Raw Clips” playlist, I do not apply any calibration: we take the DI recorded at gain 0 on a 12.2 dBu interface (Apollo Twin X) and we send it to the NAM plugin without touching the plugin gain, with the output level set to “normalized”:
- 01 – NAM MarkT-15 5.74: NAM model “6”
- 02 – NAM MarkT-15 11.76: NAM model “12”
- 03 – MarkT-15 reamp: DI reamp to the actual amp at 11.76 dBu from the TwinX
- 04 – NAM MarkT-15 15: NAM model 15
- 05 – NAM MarkT-15 18: NAM model 18
Pay particular attention to the note fades: [+7s – +13s] and [+43s – end of the sample] and to the section [+14s – +43s] to appreciate the level of gain obtained. We can easily hear the increase in gain level between the different samples. The sample “03 – MarkT-15 reamp” corresponds to the DI reamped in the conditions of the model capture, using the same loadbox and identical settings: it is therefore the reference and the true level of gain obtained on the amp and you will notice that the closest sample is the one of the model “12”: the gain is close here because the model is calibrated “naturally”: the DI is recorded on a +12.2 dBu interface and the model is captured at 11.76 dBu: we are therefore very close. The “6” therefore sounds with less gain (at 0 dBFS the model is equivalent to 6 dBU for the amp), the 15 with a little more gain than the real gear (at 0 dBFS the model is equivalent to 15 dBU for the amp), and the 18 gives even more gain….
In the second playlist (“Using NAM Part 3 – Calibrated Clips”), I manually calibrate the plugin:
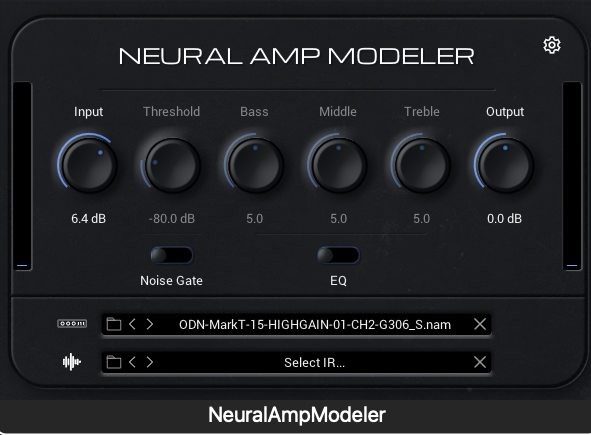
- 01: The plugin is calibrated at 12.2 – 5.74: +6.46 (+6.4)
- 02: The plugin is calibrated at 12.2 – 11.76: +0.44 (+0.4)
- 03: DI re-amped on the real amp at 11.76, for comparison within this playlist
- 04: The plugin is calibrated at 12.2 – 15: -2.8
- 05: The plugin is calibrated at 12.2 – 18: -5.8
Sample 01 is still using model “6”, sample 02 is using model “12”, and so on…
This corresponds to configuring the NAM plugin as follows for sample 01:
Here is the playlist :
If you listen to this “Calibrated clips” playlist, you will notice that the models now sound almost identical: there are still some differences, especially on model 18, on which you will notice that there is generally more gain, which can also be heard when notes fade out, the levels remaining higher than with the other samples… These differences can be attributed to the fact that the amp does not react linearly to the different signal levels sent to it (higher compression) when re-amping the input file and that this parameter (i.e. the re-amping level used) is not neutral in the captures that we can create. We will come back to this aspect in a future article in the series. The other models give fairly consistent and coherent results: you will find a download link a little further down so that you can perform your own tests…
Finally, the third playlist, “Nam VS Amp,” features three excerpts, this time based on different takes; all tracks are normalized to -10 dBFS:
- The left track is a calibrated Model 12 on all samples, using the sample DI; the tracks on the right use the real amp and the same loadbox used when capturing the models.
- Sample 01: The DI from the previous examples is re-amped on the real amp (right track)
- Sample 02: Another take with a Lehle split, on Apollo TwinX, gain at 0: on the left, calibrated model 12, on the right, signal sent to the amp and captured by a load box
- Sample 03: Another take with a Lehle split, on SSL2+ MKII, gain at 0: on the left, calibrated model 12, on the right, signal sent to the amp and captured by a load box
The same SH4 mic is used on all three examples, but the three examples are not played at the same intensity: the idea here is to observe the left channel result (NAM model) versus the right channel result (the amp).
The pack of three MarkT models corresponding to the 06/12/15 models used in these examples is available here: https://overdriven.fr/overdriven/index.php/download/nam-models-using-nam-part-3/. Please share your experience by posting comments at the bottom of this article.
Conclusion
By implementing the gain staging steps, we can leverage the NAM models using the appropriate gain range for a given model and this gives a realistic starting point : from there, we will be able to adjust the tone according to our taste… By following these steps, we are guaranteed to land in the correct range of gain of our models (which, by the way, will give you a result that may satisfy you….or not 🙂 ) … And we also note that the level of re-amping used for the creation of the models may not be totally neutral: the creation of models and the levels of re-amping will be addressed in a future article in the series.
Change log
- Created : 08/17/2025
- Edits : 08/18/2025
- Edits : 08/19/2025
- Edit : 08/27/2025
2025-09-13 at 18:13
During the Automatic calibration would you not also calibrate the output mode, as opposed to ‘normalised’ as per your first image above?
2025-09-14 at 12:03
Hello Hazim,
Indeed, there is also a calibration option for the output of the plugin, which is distinct from the input calibration : it controls the loudness of the model, based on a second value that can also be provided in the models (“reamp return level”). This is a distinct setting and I’ll cover this aspect in another blog post of this series. You can also have a look to the original docs from Steve Atkinson if you want to dig into this topic : https://neural-amp-modeler.readthedocs.io/en/latest/tutorials/calibration.html
David