Updated : September 12, 2020
I am sharing in this post my basic knowledge and practices on EQ’ing metal/distorted guitar tone, mainly for standalone practice and when using software and hardware impulse response loaders (Mooer Radar or Torpedo CAB M/Wall of Sound).
SPOILER ALERT : if you are already experienced with EQ, you will probably not learn any new or incredible EQ tips in this post, as I rather try to avoid using too much EQ tweaks 🙂
Introduction
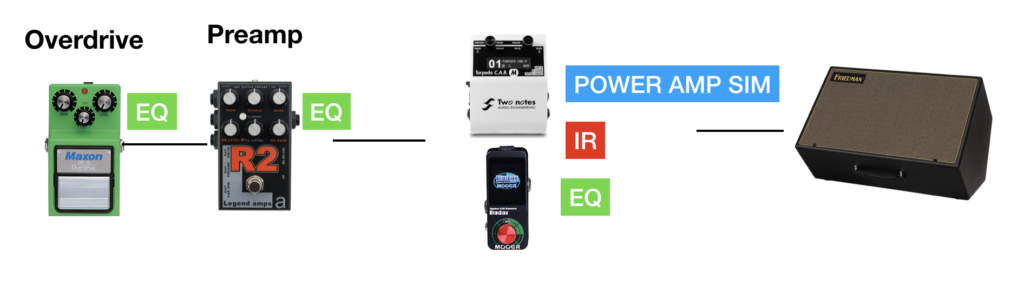
To get started with the topic, let’s remind that your overdrive pedal -if you use one- and guitar amp or preamp pedal settings are the first and major components that will shape the tone you get. And your cab and speaker(s), of course, will play a MAJOR role in the final tone ….
When using IRs, IRs will replace your real cab and will add a microphone in the equation, and -similarly to a real guitar cab- this will strongly shape the tone that you get.
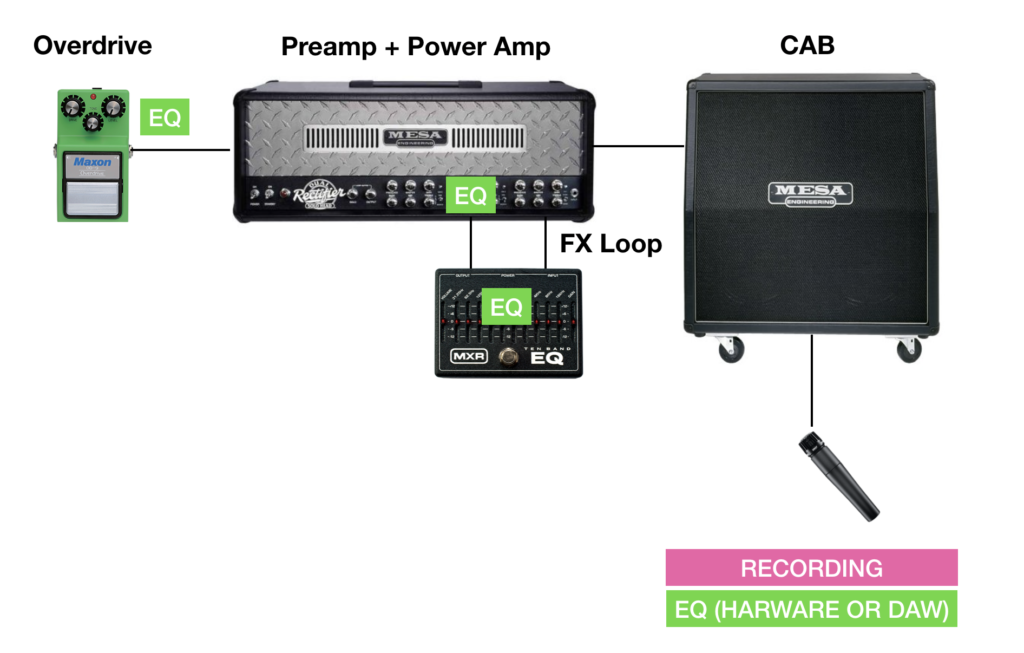
IRs typically bring additional capabilities and EQ modules are one of the frequent weapons you get with an IR loader. EQ’ing with IRs allows for additional -potentially finer- adjustments with more bands and more EQ shapes compared to simply using a real amp and a real cab (I am not talking about recording here, as in this case you will be able to apply additional EQ either at recording time or after recording, in your DAW for example).
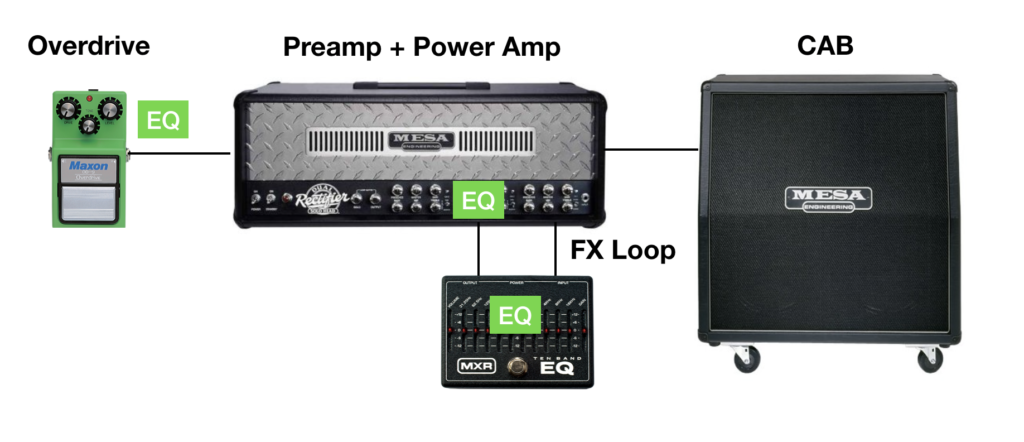
IR EQ is applied at the very end of the signal path ; they take place after the cab and the microphone, in a similar way to an actual cabinet recording. Overdrive pedals and amp tone stacks have a certain range of action and use certain shapes : they may be different from one amp to another amp (different frequency bands and widths for bass and treble for example, amps with depth controls versus no depth control…). Eq’ing with overdrive and amp tone stacks is often a trade off : for example, you can raise the bass on the amp to get presence in the low register, but you may suffer of more boominess in your overall tone, even if your OD can can come to the rescue and help in limiting or counter balancing this…..To further tweak your sound in this real world setup, using a parametric or a multi bands eq in the guitar amp FX loop can help….
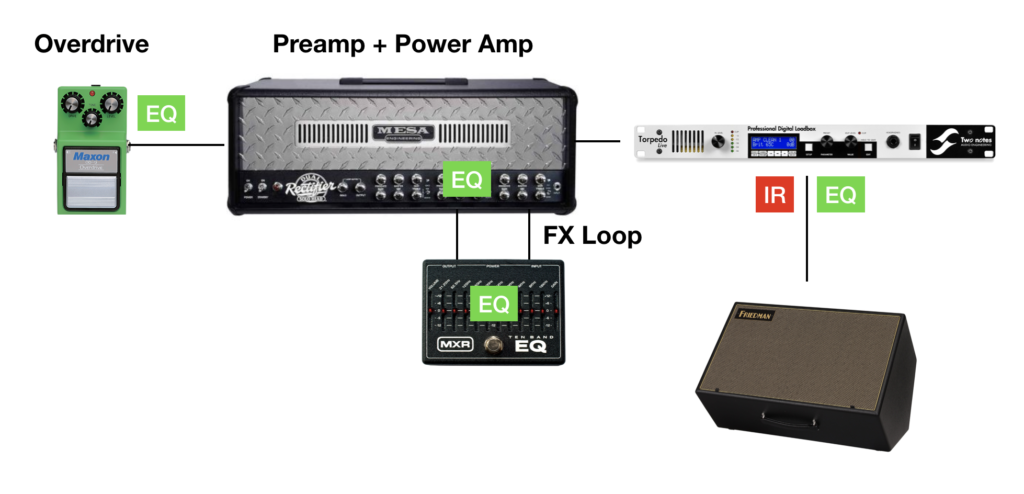
In a setup using IRs, post IR EQ gives you additional possibilities and ranges : tweaks can be finer or coarser and the possibilities you get do not have a direct equivalent in your classical signal chain, as you can apply recording EQ techniques to your live signal (still discussing the sound in the room). Is is similar to the process of applying EQ to a recorded guitar tone :
Using IRs, you often get this capability directly with your IR loading device :
Some overdrive or amp settings tweaks will not impact the signal the same way that EQ’ing at IRs level does: overdrive and amps sit earlier in the signal chain… For instance, an overdrive pedal behaves -for one part- a little bit like an HPF (High Pass Filter) but it takes place very early in the signal chain and is applied to only a part of your signal : your pickup output.
EQs and IRs
The EQ capabilities depend on the IR loading device you use : a hardware based IR loader or a software based IR loader. With a DAW, using plugins, you can access advanced EQ techniques : EQ plugins are countless and can be extremely powerful, using many parameters and shapes. In this first post dedicated to equalization, we will discuss basic EQ techniques with EQs such as the ones you get with the Mooer Radar pedal, the Two-Notes CAB M or the Wall Of Sound plugin, which are parametric or semi-parametric embedded EQs.
Note : a parametric EQ allows you to select frequency bands centers, apply gain correction and let you adjust the Q factor, which impacts the width of the EQ correction. A semi-parametric EQ will omit some of these parameters -for instance Q could be a fixed value-. Fixed bands EQ are even simpler : they have predefined frequency centers and ranges.
Context and intent !
Let’s focus on standalone, distorted guitar sounds in this post. Each time you use an EQ, you do this in a context : for example a standalone guitar tone versus a guitar tone in a mix. You also apply your changes using a specific listening device. While the techniques can be similar, the tone changes and choices will slightly vary between standalone situations and mix situations, or from a loud live sound to a mix.
Eventually, you will adjust your settings from one listening device to the other if it is a standalone guitar sound (ie clear headphones versus boomy monitors, small room versus large room, loud FRFR speaker…etc) : the behavior of your speakers have their importance and even « neutral » monitors or FRFR speakers color your sound.… Your pickups, guitar tuning, your amp and even your music style will come into play : hard rock power chords will make you go in a tone direction that will be very different from fast and technical metal. Standard tunings may require that you to beef-up your low end to get those big shake-the-walls palm mutes, while down tuned Meshuggah-like riffs will probably send you in a different direction, as in this case you will probably be cutting strong bass resonances that would otherwise drown your low notes into the mud…
(Metal) guitar EQ : frequency ranges
Let’s define some EQ bands in order to be able to describe and discuss the impact of EQ changes. This is how I identify the frequency ranges for distorted guitar and you may find people or articles describing these bands a little bit differently….
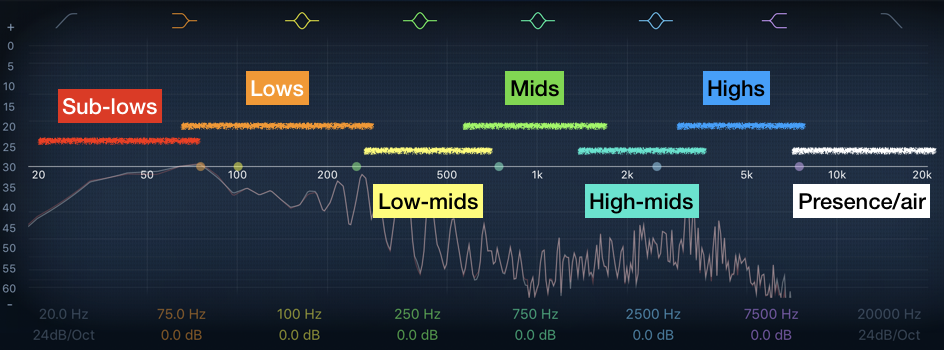
I overlapped the bands on the picture on purpose as these definitions are not strict : take them with a pinch of salt….
For distorted guitars, let’s try to describe how each band impact the sound :
- Sub-lows : you will probably get only rumble and resonance here, most of the time metal guitar players will get rid of this or slightly diminish these frequencies by using a HPF. When using small or bright speakers you may also ignore it as the speaker may filter this by not really being able to reproduce this low frequency range
- Lows : critical for metal guitars, adjusting this will have a strong impact on your tone (metal guitar tone rely heavily on this frequency range) : usually adjusted on the low end part by using a HPF, which will allow the bass to be cleaner and better perceived. With too much lows (for example huge 120 HZ peaks), this section might overtake the whole tone with a masking effect, or produce an unbalanced tone, where you lack definition and articulation. Different speakers and cabinets produce different low sections : some will be more pronounced at 100-120 Hz, others will be stronger around 200 Hz. Same for IRs.
- Low-Mids : this is where the body of the guitar takes place. Too thin and you will probably be missing definition and articulation, too important you will start noticing a « woody » or boxy effect.
- Mids : « upper body » of the tone. Too much mids will result in a boxy sound. Too thin, you’ll start noticing the effects of overly scooped sound with unbalanced tone that may makes you notice that your single notes are lacking punch, definition and are just « too thin ».
- Hi-mids : the bite starts around this range and a lots of things happen here. This area is affected as well by gain/distortion and a lot of harmonics are perceived here. Too low : you will probably be in a darker type of sound, too high : you may generate hear fatigue with too much aggression in the treble.
- Highs : same remarks as for the hi-mids. You’ll start hearing hiss and ice-picking effects when this section is too loud.
- Presence/air : this area may or may not be an issue. A lot of guitar speakers see their frequency responses dropping severely after 5, 6 or 7 kHz. When using IRs, the amount of tone you get here depends on the microphone behavior (i.e. its own frequency response) as well as the recording position that was used. Often reduced by using either a low-pass filter or a high-shelf.
Before trying to EQ anything on IRs, I usually try to perform these steps to get into the tone area that suits my purpose :
- Give a try to another IR of the same speaker / mic with a different position or settings if too bright, dark or scooped, if such a different position/setting is available
- Adjust my amp or pedals settings (amp EQ, presence, gain)
- Adjust the power-amp simulation settings if I use one, as this can have a massive impact on the tone balance
Then, eventually, I’d start applying some IR EQ tweaks.
Bell, shelf, HPF, LPF
The most common EQ corrections are the following :
- Bell -or peak-: the most common shape. Most EQs apply their gain changes with this shape
- Shelf : used often at the extreme of the sound spectrum with low-shelf and high-shelf
- Low pass and high pass filters
Note : I am not discussing notch filters here. They will probably be mentioned in a second post on the topic.
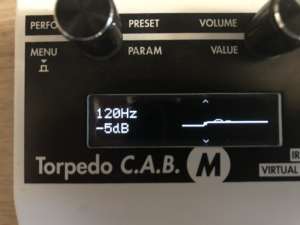
The Torpedo CAB M and the Wall of Sound plugin come with a guitar EQ that is configured with the following bands : 120Hz, 360Hz, 800Hz, 2000Hz, 6000Hz (center frequency of each band from the lower to the highest). You can access as well a semi-parametric EQ on the CAB M where the band center frequency can be customized. This semi-parametric EQ gives you access to a low-cut filter as well.
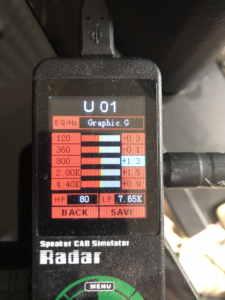
On the Mooer Radar, three EQs are available :
- One for guitar with 5 bands that you can modify, plus a HPF and a LPF
- One for bass with 5 bands also
- One fully parametric with 4 bands (where you can modify the Q factor)
If not indicated otherwise, these EQ use classical bell shapes or LPF and HPF. The Wall Of Sound documentation describe the low frequency (120 Hz) and high frequency (6 kHz) as being shelve filters. This is not mentioned in the CAB M documentation but it would make sense that the CAB M eq behaves the same way. Using shelves at the extreme of the EQ device make sense as you probably want to treat the whole beginning or remaining of the frequency band with the same setting.
Altering the tone with EQ settings has an impact on the overall volume : you will often need to compensate the volume changes by adjusting the master volume of the IR loader, up or down.
My basic EQ techniques (standalone practice)
I try to avoid relying too much on EQ : I rather try to find IRs that have a tone balance that suits my needs or specific situation and then I try to make as little adjustments as possible. It turns out that the more I alter the IR with EQ tweaks, the more I change it’s tone balance and the more I find myself trying to compensate / rebalance the tone with more and more tweaks : I often end-up with a less interesting or less natural sounding result than what I got when I started using the raw IR….:) Feel free to experiment EQ with IRs and make your own experience 😉
Having a large and diverse library of IRs can be very useful : it allows for multiple and diverse starting poings, and it brings more tonal options.
I personally try to match my amps and pedals to raw IRs as much as possible, and I try to keep my EQ tweaks to a minimum.
These tweaks for standalone guitar practice are- in my personal case- usually the following :
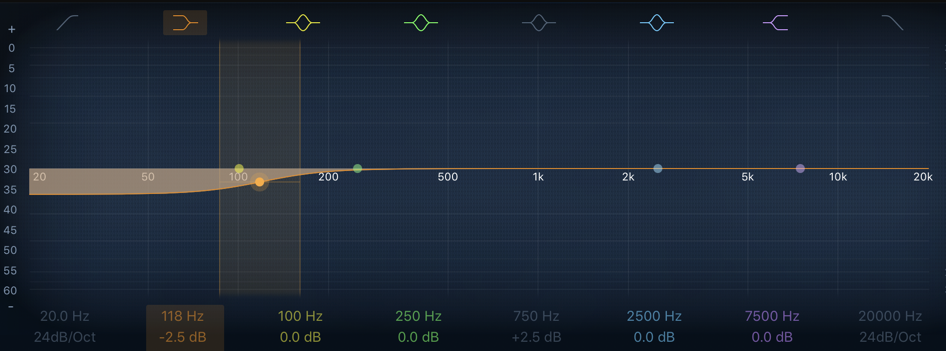
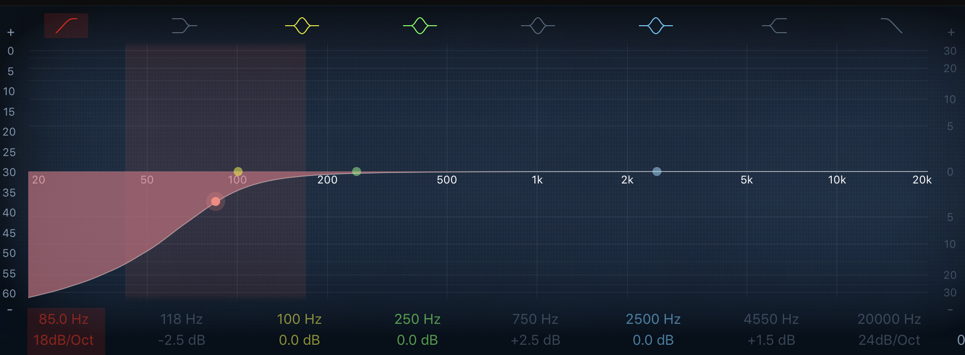
- Most of the time I use a HPF / low-cut, between 60 to 80 Hz, sometimes over 100 Hz.
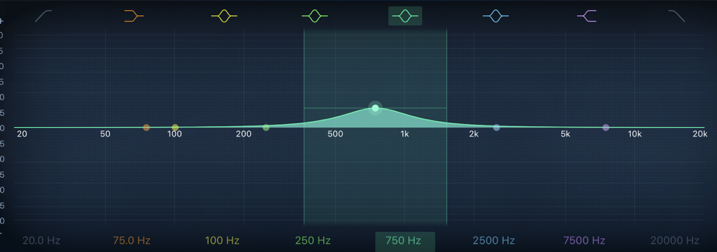
- When using « flat » or « neutral » IRs, if I need a more scooped sound, I try to scoop the tone on the amp or on the pedal in the first place. If the result has still too much mids to my taste, I would then start lowering the 800 Hz band on the EQ (you can also change the center frequency for this band and you can try scoops from 400 to 1100 Hz….)
- On my own IRs, especially for the first generation ones, I may do the opposite and raise the 800 Hz band as some of them can be slightly scooped already
- When the IR has way too much bass -or the headphone I use is too boomy- and lowering the amp’s bass makes the sound too thin, I’ll start lowering the 120 Hz and 360 Hz area to reduce the “boominess” and regain some clarity
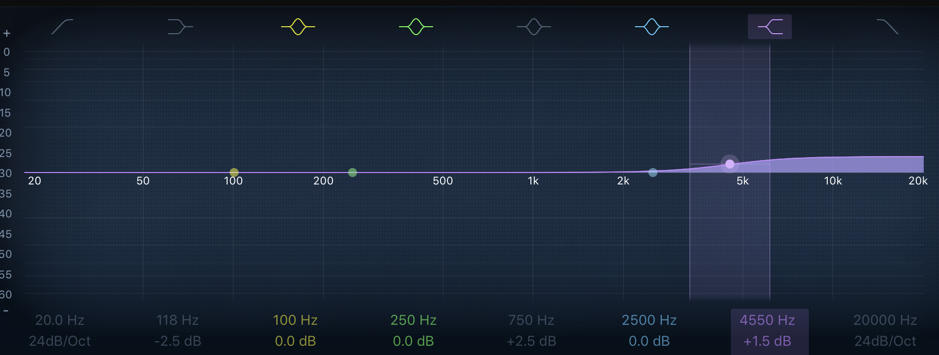
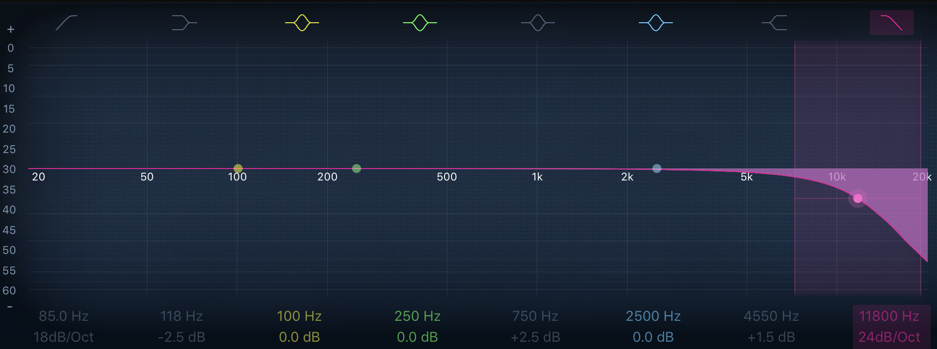
- If too much hiss or ice-picking treble, I may use an LPF or lower a little bit the 2 kHz and/or 4 kHz and/or the 6 kHz bands (this last one is a shelf filter for the Two-Notes plugin and pedals).
- if the IR or the amp/IR association is too “dull” and lacks punch, I would start raising the 2 to 4 kHz area a little bit
Conclusion
I presented a few basic concepts in this post regarding tone adjustment by using EQ techniques with IRs. As discussed, I try to keep my EQ adjustments to a minimum and I rather try to spot an adequate IR, adjusting the amp and pedals first, and then simply adjusting the low-end with an HPF … I know the tone/the IR is OK when I simply play my guitar for hours and don’t feel the need for any tweaks … because it just sounds right 🙂
Complementary to EQ, another interesting approach is to mix IRs in order to combine their tone characteristics : I will present some techniques and tools for IR mixing in the next blog post.
Continue reading
Previous post : Software Impulse Response loaders (IR part 7)
Next post : Impulse responses part 9 : mixing IRs
Leave a Reply